印度
安装
:ref:`安装<general/install>`以下模块,以获得印度本地化的所有功能:
名称 |
技术名称 |
说明 |
|---|---|---|
印度—会议 |
|
默认:ref: |
印度电子发票 |
|
|
印度电子运单 |
|
|
Indian E-waybill Stock |
|
|
Indian - Check GST Number Status |
|
|
印度 - GSTR India 电子文件 |
|
|
Indian - Accounting Reports |
|

印度配置
在 中,添加您的 PAN 和 GSTIN。PAN 是确定纳税人类型所必需的,而 GSTIN 是生成电子发票和电子运单所必需的。
电子发票系统
Odoo 符合**印度商品和服务税(GST)电子发票系统**的要求。
设置
NIC 电子发票注册
You must register on the NIC e-Invoice portal to get your API credentials. You need these credentials to configure your Odoo Accounting app.
Log in to the NIC e-Invoice portal by clicking Login and entering your Username and Password;
注解
If you are already registered on the NIC portal, you can use the same login credentials.
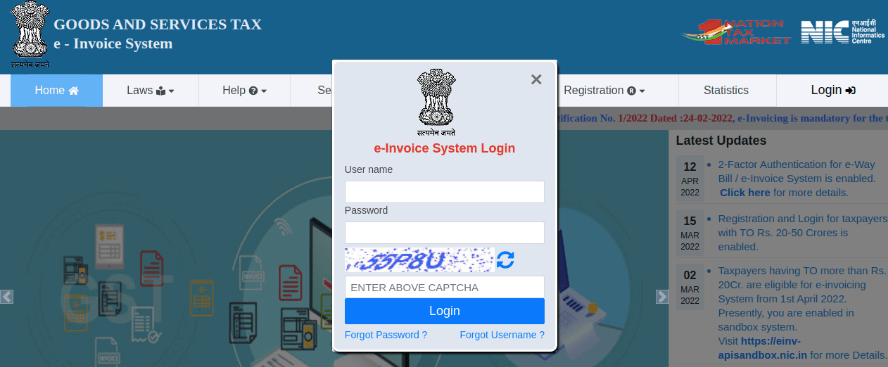
From the dashboard, go to ;
After that, you should receive an OTP code on your registered mobile number. Enter the OTP code and click Verify OTP;
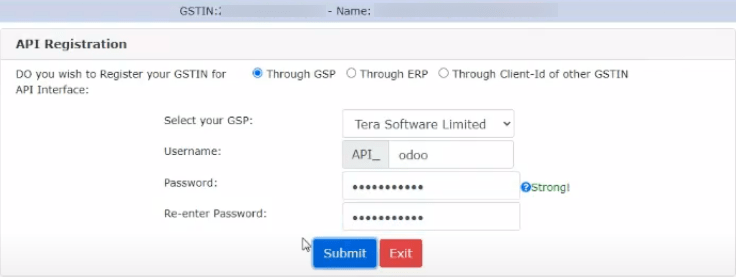
Select Through GSP for the API interface, set Tera Software Limited as GSP, and type in a Username and Password for your API. Once it is done, click Submit.
Odoo 中的配置
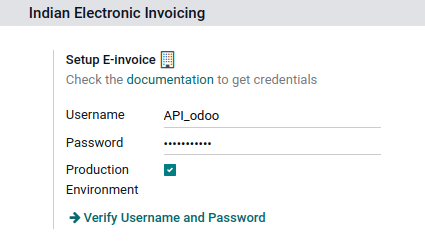
To enable the e-Invoice service in Odoo, go to , and enter the Username and Password previously set for the API.
日记账
要自动向 NIC 电子发票门户网站发送电子发票,您必须首先配置您的 销售 日记账,方法是进入 ,打开您的 销售 日志,在 高级设置 选项卡的 电子数据交换 下,启用 电子发票(IN) 并保存。
工作流
Invoice validation
发票一经验证,顶部就会显示一条确认信息。一段时间后,Odoo 会自动将已验证发票的 JSON 签名文件上传到 NIC 电子发票门户网站。如果您想立即处理发票,请点击 立即处理。

注解
您可以在沟通栏附件中找到经 JSON 签名的文件。
您可以在发票的 EDI 文件 选项卡或 电子发票 字段下检查文档的 :abbr:`EDI(电子数据交换)`状态。
开票报告PDF
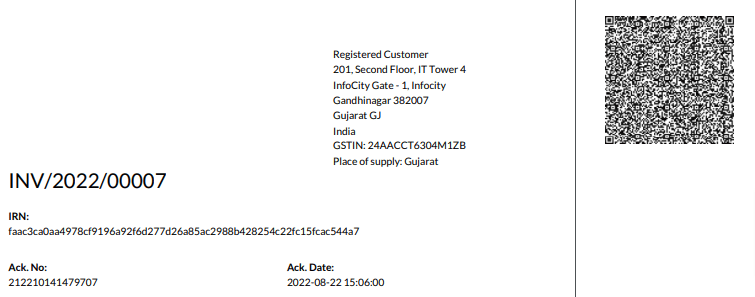
发票一经验证和提交,即可打印发票 PDF 报告。报告包括 IRN(发票参考号)、:guilabel:`Ack. No`(确认编号)、:guilabel:`Ack.Date`(确认日期)和二维码。这些证明发票是有效的财务文件。
取消电子发票
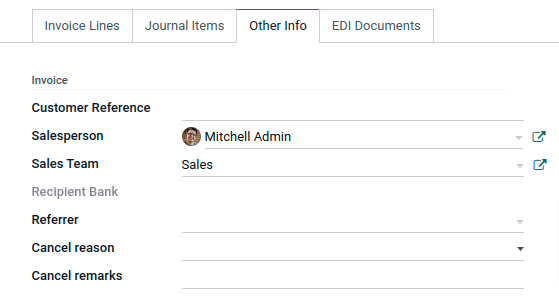
如果您想取消电子发票,请转到发票的 其他信息 选项卡,填写 取消原因 和 取消备注 字段。然后,点击 请求 EDI 取消。电子发票开具`字段的状态将变为 :guilabel:`取消。
注解
If you want to abort the cancellation before processing the invoice, then click Call Off EDI Cancellation.
一旦您请求取消电子发票,Odoo 将自动向 NIC 电子发票门户网站提交 JSON 签名文件。如果您想立即处理发票,可点击 立即处理。
Management of negative lines in e-Invoices
负数行通常用于表示与特定产品或全单折扣相关的折扣或调整。政府门户网站禁止提交带负数行的数据,这意味着需要根据 HSN 代码和消费税税率对负数行进行转换。这项工作由 Odoo 自动完成。
Example
Consider the following example:
Product Details |
|||||
|---|---|---|---|---|---|
Product Name |
HSN Code |
Tax Excluded |
Quantity |
GST Rate |
合计 |
产品字段 |
123456 |
1,000 |
1 |
18% |
1,180 |
产品 B |
239345 |
1,500 |
2 |
5% |
3,150 |
Discount on Product A |
123456 |
-100 |
1 |
18% |
-118 |
Here’s the transformed representation:
Product Details |
||||||
|---|---|---|---|---|---|---|
Product Name |
HSN Code |
Tax Excluded |
Quantity |
Discount |
GST Rate |
合计 |
产品字段 |
123456 |
1,000 |
1 |
100 |
18% |
1,062 |
产品 B |
239345 |
1,500 |
2 |
0 |
5% |
3,150 |
In this conversion, negative lines have been transformed into positive discounts, maintaining accurate calculations based on the HSN Code and GST rate. This ensures a more straightforward and standardized representation in the E-invoice records.
GST 电子发票验证
提交电子发票后,您可以从 GST 电子发票系统网站上验证发票是否已签署。
从附件中下载 JSON 文件。它可以在相关发票的沟通栏中找到;
打开`NIC 电子发票门户网站 <https://einvoice1.gst.gov.in/>`_,进入 ;
选择 JSON 文件并提交;

如果文件已签署,则会显示一条确认信息。

电子货运单
设置
Odoo 符合**印度商品和服务税(GST)电子运单系统**的要求。
API registration on NIC E-Way bill
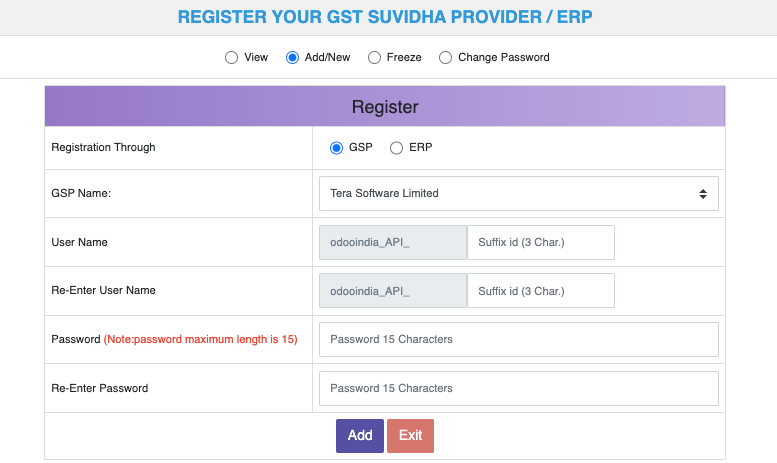
You must register on the NIC E-Way bill portal to create your API credentials. You need these credentials to configure your Odoo Accounting app.
Log in to the NIC E-Way bill portal by clicking Login and entering your Username and Password;
From your dashboard, go to ;
Click Send OTP. Once you have received the code on your registered mobile number, enter it and click Verify OTP;
Check if Tera Software Limited is already on the registered GSP/ERP list. If so, use the username and password used to log in to the NIC portal. Otherwise, follow the next steps;

Select Add/New, select Tera Software Limited as your GSP Name, create a Username and a Password for your API, and click Add.
Odoo 中的配置
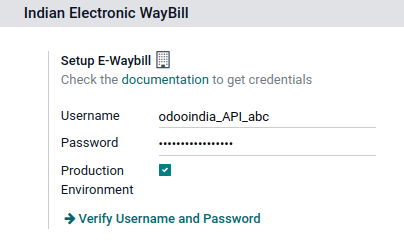
要设置电子运单服务,请访问 ,然后输入您的 用户名 和 密码 。
工作流
发送电子运单
To send an E-Way bill, confirm the customer invoice/vendor bill and click Send E-Way bill.

Invoice validation
Once an invoice/bill has been issued and sent via Send E-Way bill, a confirmation message is displayed.

注解
您可以在沟通栏附件中找到经 JSON 签名的文件。
Odoo automatically uploads the JSON-signed file to the government portal after some time. Click Process now if you want to process the invoice/bill immediately.
开票报告PDF
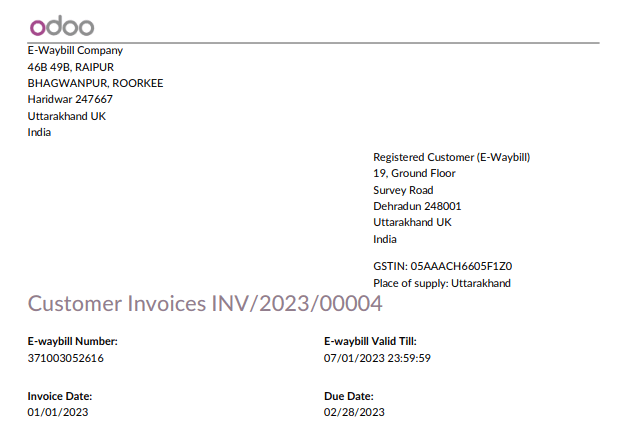
You can print the invoice PDF report once you have submitted the E-Way bill. The report includes the E-Way bill number and the E-Way bill validity date.
E-Way bill cancellation
If you want to cancel an E-Way bill, go to the E-Way bill tab of the related invoice/bill and fill out the Cancel reason and Cancel remarks fields. Then, click Request EDI Cancellation.
重要
Doing so cancels both the e-Invoice (if applicable) and the E-Way bill.

注解
If you want to abort the cancellation before processing the invoice, click Call Off EDI Cancellation.
Once you request to cancel the E-Way bill, Odoo automatically submits the JSON-signed file to the government portal. You can click Process Now if you want to process the invoice immediately.
E-waybill creation from receipts and delivery orders
注解
Make sure the E-Way bill Stock module is installed and the E-Way bill setup is complete.
To create E-Way bills from receipts and deliveries in the Inventory app, follow these steps:
Go to or and select an existing delivery order/receipt or create a new one.
Click Create E-waybill/Challan.
注解
To create an E-way bill:
A delivery order must be in the Done state (i.e., validated)
A receipt must have the Ready or Done state.
Click Generate e-Waybill to validate the E-Way bill and send it to the NIC E-Way bill portal.
小技巧
To use the E-Way bill as a challan for goods deliveries without sending it to the NIC E-Waybill portal, click Use as Challan.
To print the E-waybill or the challan, click the (gear) icon and select Ewaybill / Delivery Challan.
Indian Check GSTIN Status
通过 印度 - 检查商品和服务税号码状态 模块,您可以直接从 Odoo验证 :abbr:`GSTIN(商品和服务税识别号码)`的状态。
要验证联系人的商品及服务税号状态,请访问客户/供应商表单并点击 检查 GSTIN 状态 旁边的 GSTIN 字段。
要验证发票/账单上输入的消费税号码的状态,请访问发票/账单并点击 GST 状态 字段旁边的 )按钮。
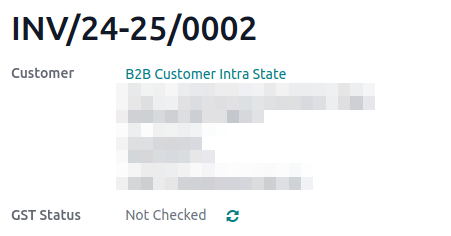
系统会显示通知确认状态更新,GSTIN 状态和验证日期也会记录在联系人的沟通栏中。
Indian GST Return filing
Enable API access
To file GST Returns in Odoo, you must first enable API access on the GST portal.
Log into the GST portal by entering your Username and Password, and go to My Profile on your profile menu;

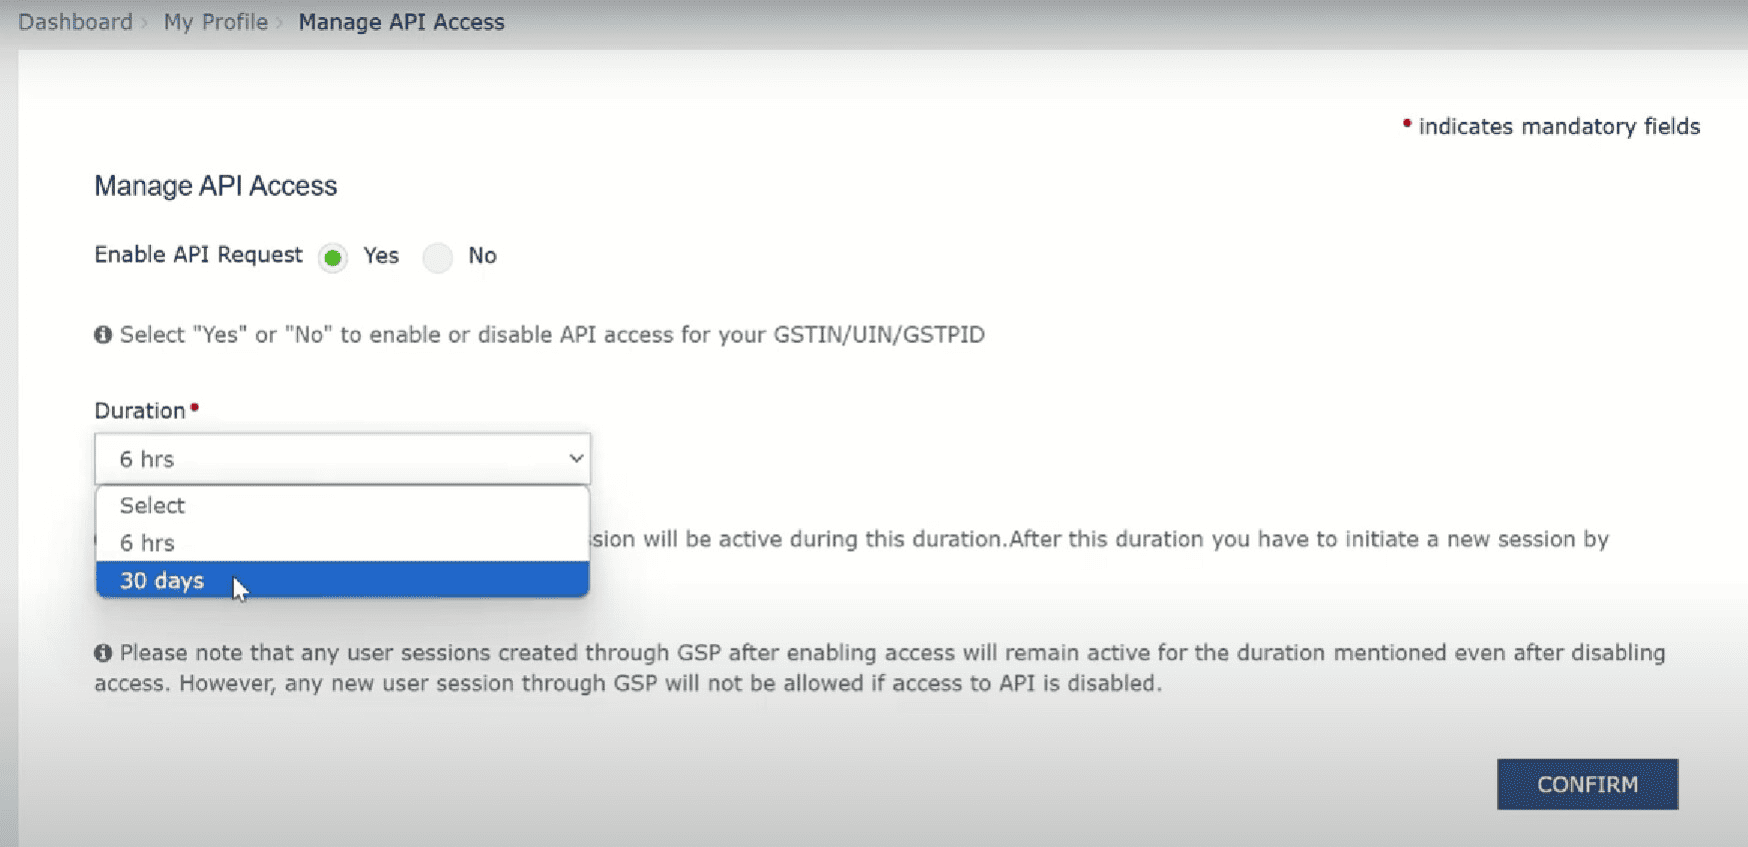
Select Manage API Access, and click Yes to enable API access;
注解
It is recommended to set the Duration to 30 days to avoid the need for frequent token reauthentication.
这样做将启用 持续时间 下拉菜单。选择您偏好的 持续时间 并点击 确认。
Odoo 中的印度 GST 服务
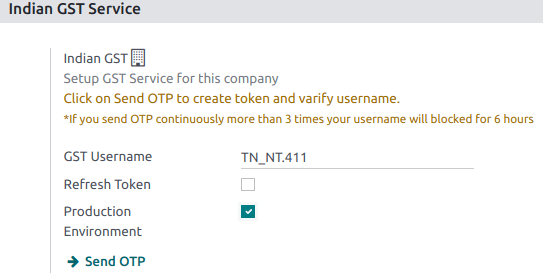
在商品及服务税门户网站上启用 API 访问<india/gstr_api>`后,您就可以在 Odoo 中设置 :guilabel:`印度 GST 服务。
进入 并输入 GST 用户名。点击 发送 OTP,输入代码,最后点击 验证。
File-in GST Return
当 印度 GST 服务 配置完成后,您就可以提交消费税申报表了。进入 并创建一个新的 GST 申报期 (如果不存在)。在 Odoo 中,GST 申报分**三步**完成:
注解
报税周期 可以根据用户需要 配置 。
发送 GSTR-1
Click GSTR-1 Report to verify the GSTR-1 report before uploading it to the GST portal.

注解
The system performs basic validations to ensure compliance with the GST portal’s requirements. Possible issues include:
Incorrect Tax Application: The tax type does not match the Fiscal Position (CGST/SGST applied instead of IGST for interstate transactions, or IGST applied instead of CGST/SGST for intrastate transactions).
Missing HSN Code: No HSN Code is defined for the product.
Invalid HSN Code for Services: The HSN Code for a service does not start with “99” or is incorrect.
Non-compliant UQC: The Unit Quantity Code (UQC) does not meet Indian GST standards.
If any validation fails, the system alerts users with a warning, highlighting the discrepancies and providing a direct link to the affected lines.

Click Generate to view the report in Spreadsheet view.


If the GSTR-1 report is correct, then click Push to GSTN to send it to the GST portal. The status of the GSTR-1 report changes to Sending.

几秒钟后,GSTR-1 报告的状态将变为 等待状态。这意味着 GSTR-1 报告已发送到 GST 门户 并正在 GST 门户 上验证;

Once more, after a few seconds, the status either changes to Sent or Error in Invoice. The status Error in Invoice indicates that some of the invoices are not correctly filled out to be validated by the GST portal;
If the state of the GSTR-1 is Sent, it means your GSTR-1 report is ready to be filed on the GST portal.

If the state of the GSTR-1 is Error in Invoice, invoices can be checked for errors in the chatter. Once issues have been resolved, the user can click Push to GSTN to submit the file again on the GST portal.

Click Mark as Filed after filing the GSTR-1 report on the GST portal. The status of the report changes to Filed in Odoo.

Receive GSTR-2B
Users can retrieve the GSTR-2B Report from the GST portal. This automatically reconciles the GSTR-2B report with your Odoo bills;
Click Fetch GSTR-2B Summary to retrieve the GSTR-2B summary. After a few seconds, the status of the report changes to Waiting for Reception. This means Odoo is trying to receive the GSTR-2B report from the GST portal;

Once more, after a few seconds, the status of the GSTR-2B changes to the Being Processed. It means Odoo is reconciling the GSTR-2B report with your Odoo bills;

Once it is done, the status of the GSTR-2B report changes to either Matched or Partially Matched;
If the status is Matched:

If the status is Partially Matched, you can review and modify the bills by clicking View Reconciled Bills. This will display categorized discrepancies, such as bills missing in Odoo or GSTR-2. After making the necessary corrections, click re-match to update the reconciliation and ensure accuracy before finalizing the report.

GSTR-3 报告
GSTR-3 报告是**销售额**和**采购额**的月度汇总。该报表通过提取**GSTR-1**和**GSTR-2**中的信息自动生成。
用户可通过点击 GSTR-3 报告 将**GSTR-3**报告与**GST门户网站上提供的**GSTR-3**报告进行比较,以验证两者是否匹配;
Once the GSTR-3 report has been verified by the user and the tax amount on the GST portal has been paid. Once paid, the report can be closed by clicking Closing Entry;

In Closing Entry, add the tax amount paid on the GST portal using challan, and click POST to post the Closing Entry;
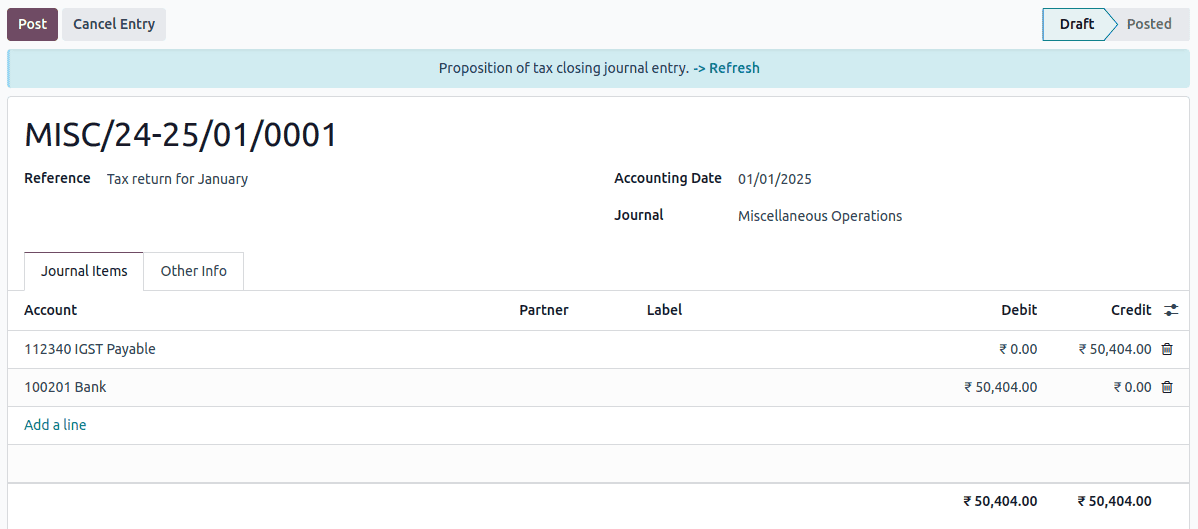
Once posted, the GSTR-3 report status changes to Filed.

Tax reports
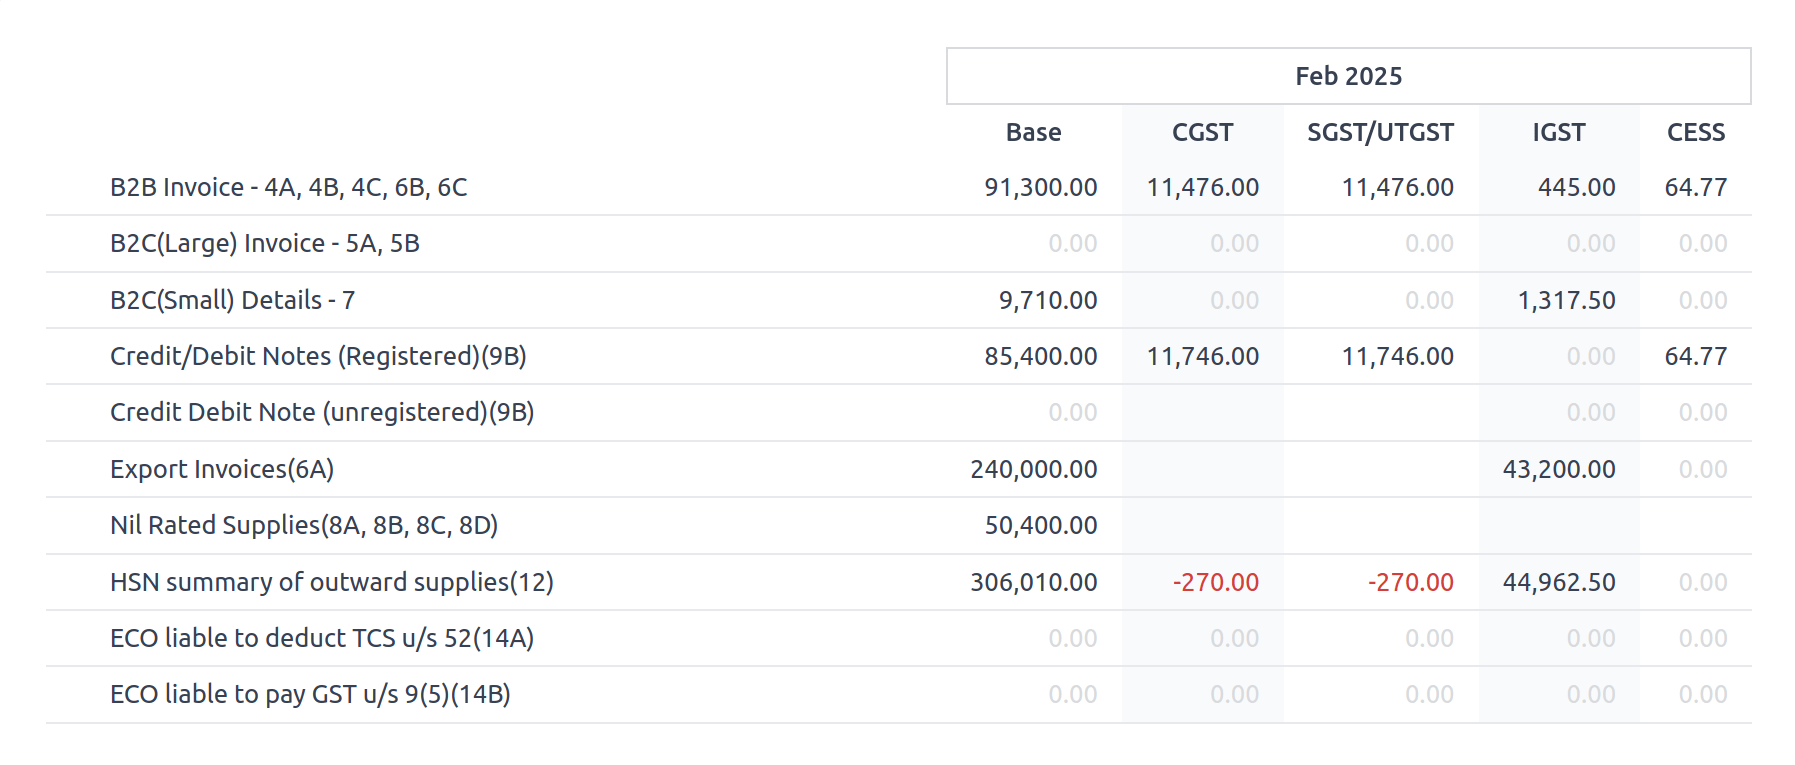
GSTR-1 report
The GSTR-1 report is divided into sections. It displays the Base amount, CGST, SGST, IGST, and CESS for each section.
GSTR-3 报告
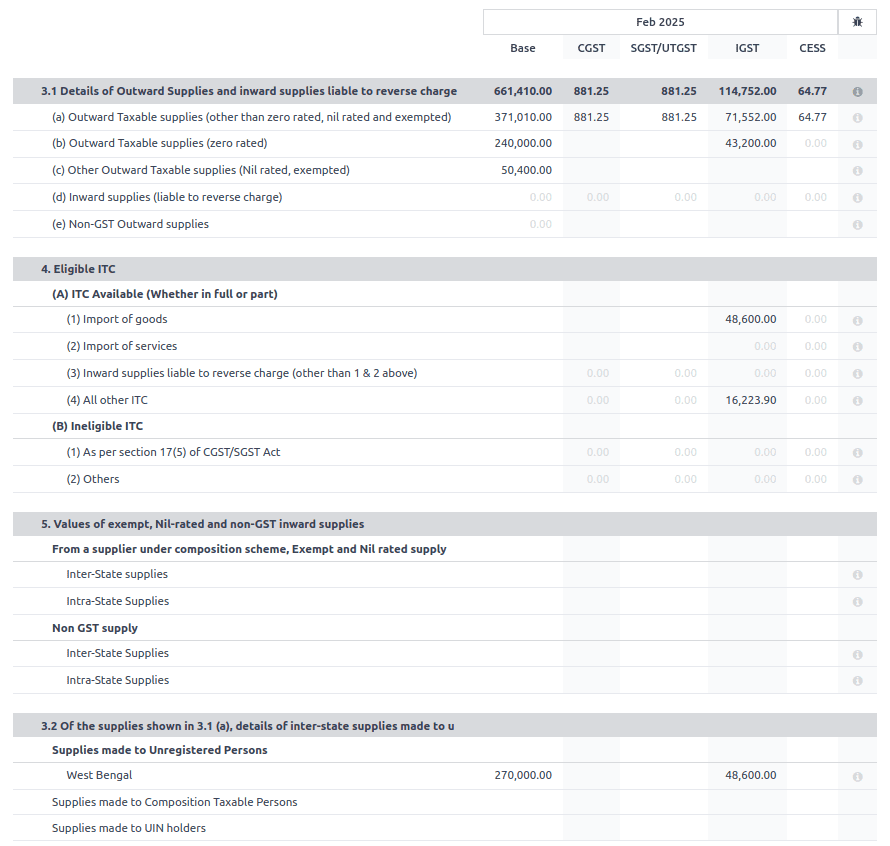
The GSTR-3 report contains different sections:
Details of inward and outward supply subject to a reverse charge;
Eligible ITC;
Values of exempt, Nil-rated, and non-GST inward supply;
Details of inter-state supplies made to unregistered persons.
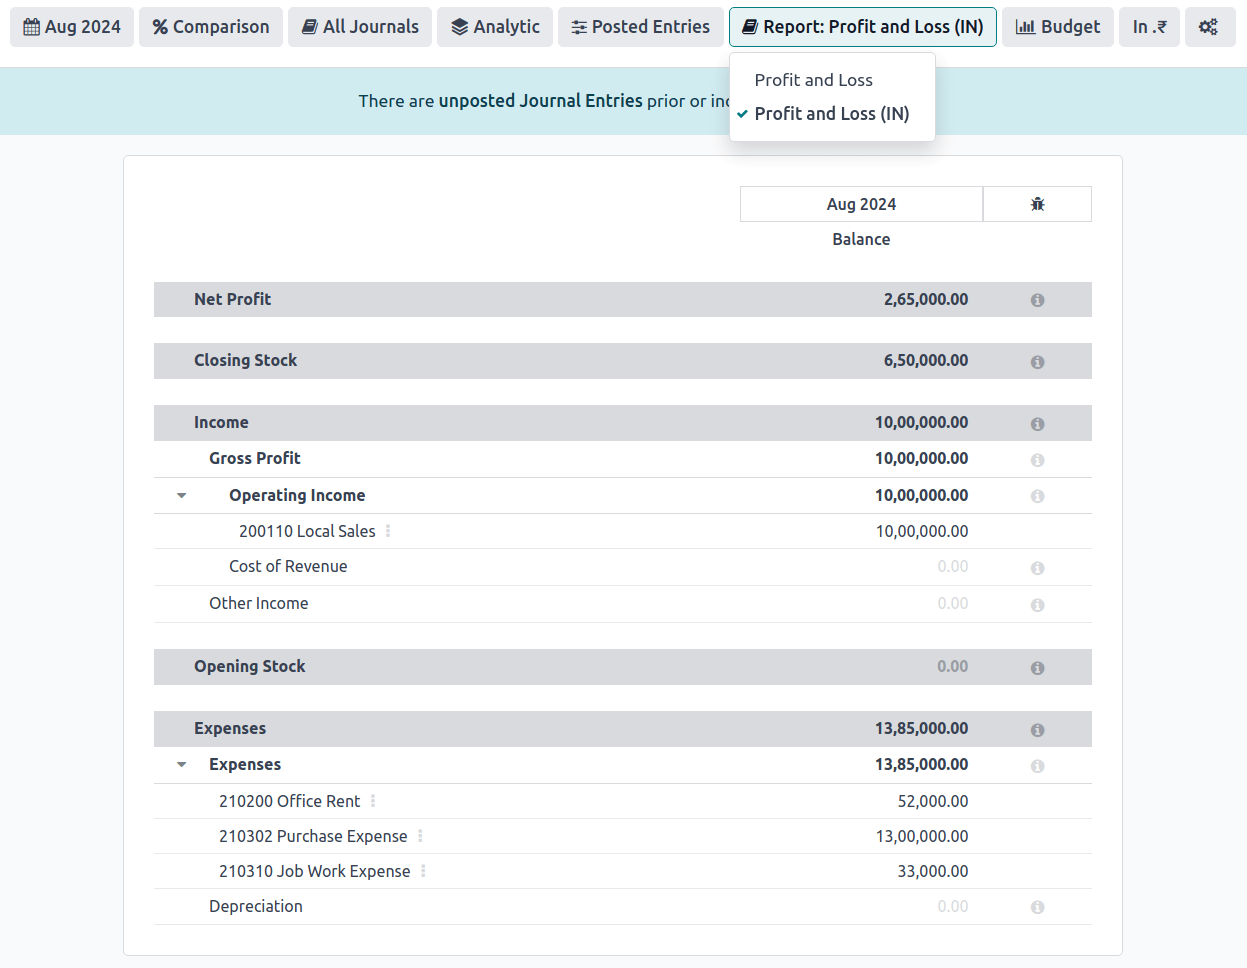
损益(IN)报告
This is a Profit and Loss report that displays the balances for Opening Stock and Closing Stock. It helps users using Continental accounting to accurately determine the cost of goods (i.e Opening Stock + purchases during the period - Closing Stock).
TDS/TCS threshold alert
TDS and TCS are tax provisions under Indian law, triggered when transaction amounts exceed specified thresholds. This alert notifies users when the value of invoices or bills surpasses these limits, prompting the application of the appropriate TDS/TCS.
To configure Odoo to advise you on when to apply TDS/TCS, set the TDS/TCS section field on the corresponding account in the chart of accounts. Odoo will display a banner suggesting the TDS/TCS section under which tax might be applicable when recording an invoice or bill.
配置
Navigate to .
In the Indian Integration section, enable the TDS and TCS feature.
Navigate to .
Click View on the desired account, and set the TDS/TCS Section field.
注解
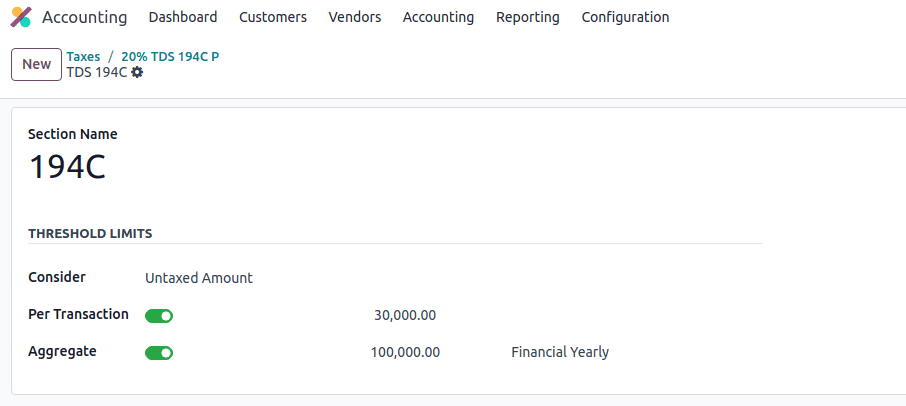
The TDS/TCS sections are pre-configured with threshold limits. If you need to modify these limits, go to . In the Advanced Options tab, click on the (internal link) icon of the Section field.
Applying TCS/TDS on invoices and bills
Based on the account used on the customer invoice or vendor bill, Odoo checks the TCS/TDS threshold limit. If the limit specified in the TCS/TDS Section of the account is exceeded, Odoo displays an alert that suggests applying the appropriate TCS/TDS. The alert will disappear once the TCS/TDS is applied.
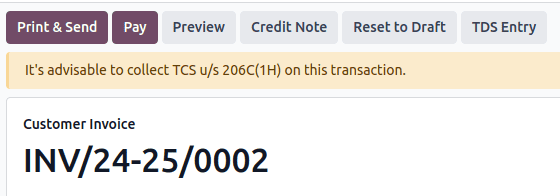
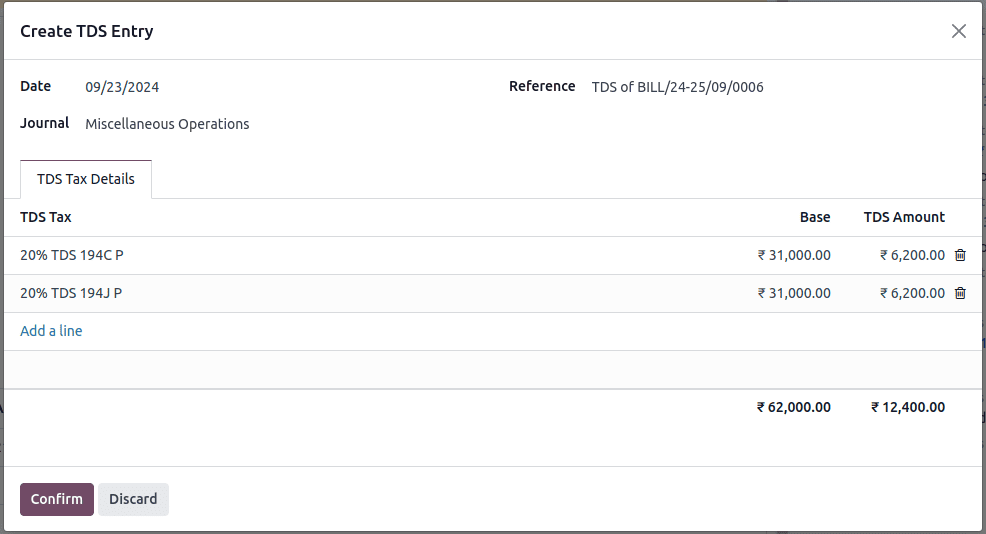
TCS is directly applicable in the tax on the invoice lines. To apply TDS, click the TDS Entry smart button on the vendor bill/payment. The popup window allows specifying the TDS details. Confirm the entry to apply the TDS.
In Odoo, the aggregate total is calculated for partners sharing the same PAN number, across all company branches.
Example
Branch |
Customer |
Invoice |
Transaction Amount (₹) |
PAN Number |
|---|---|---|---|---|
IN - MH |
XYZ Enterprise - GJ |
开票1 |
₹50,000 |
ABCPX1234E |
IN - MH |
XYZ Enterprise - GJ |
开票2 |
₹30,000 |
ABCPX1234E |
IN - MH |
XYZ Enterprise - MH |
开票3 |
₹40,000 |
ABCPX1234E |
IN - DL |
XYZ Enterprise - GJ |
Invoice 4 |
₹20,000 |
ABCPX1234E |
IN - GJ |
XYZ Enterprise - MH |
Invoice 5 |
₹60,000 |
ABCPX1234E |
Aggregate total = 50,000 + 30,000 + 40,000 + 20,000 + 60,000 = ₹200,000
The aggregate total for all customers (XYZ Enterprise - GJ, MH, DL) sharing the PAN number ABCPX1234E across all branches is ₹200,000.
