Floors and tables
The Floor plan view enables you to manage restaurant floors and table arrangements and monitor table status in real time — including occupancy, reservations, and kitchen orders.
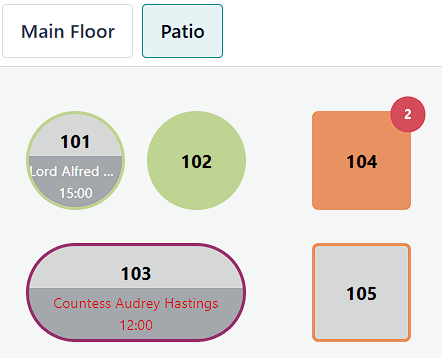
Table 101: The table is available now but booked at 15:00.
Table 102: An order has been placed and sent to the kitchen.
Table 103: The table was booked at 12:00, but customers are late.
Table 104: Two items are waiting to be sent to the kitchen.
Table 105: The table is available.
配置
From the POS backend
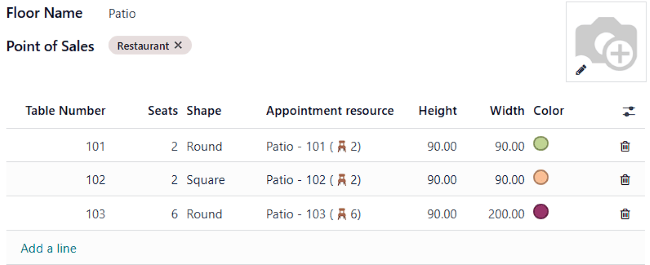
To create floors and tables from the backend, go to , and click New to create a floor. Optionally, activate additional settings by clicking the (adjust settings) icon. Then,
Enter a Floor Name.
Select the related Point of Sales.
Hover over the placeholder image and click the (pencil) icon to add a background image (e.g., your restaurant layout).
Click Add a line to create a table and set it up:
Enter a Table Number.
Fill in the number of Seats.
Select a Square or Round Shape.
Assign an Appointment resource to make the table bookable.
Adjust the Height, Width, and Color.
Click the (delete) icon to delete a table.
小技巧
Create floors on the spot: access your POS settings, type your floor name in the Floors field of the Floors & Tables Map section, and press enter or click Create and edit… to set it up.
From the POS front end
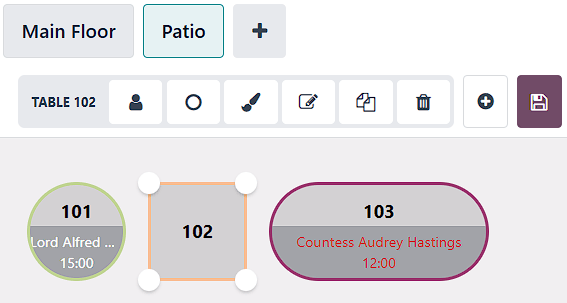
To create floors and tables from the front end, open a POS session, click the (hamburger menu) icon in the upper right corner, then Edit Plan.
Add a floor by clicking the (plus) icon, then enter a name in the modal window.
Click the (paintbrush) icon to change the background color or image.
Click Table to add a new table.
To adjust a specific table, select it and click:
The (user) icon to change the number of seats.
The (square) or (round) icon to switch the shape from round to square, and vice versa.
The (paintbrush) icon to change the table’s color.
The (rename) icon to change the table number.
The (clone) icon to duplicate the table.
The (bin) icon to remove the table.
After making all the necessary modifications, click Save or the (floppy disk) icon to save.
警告
Removing a table or a floor cannot be undone.
Table transfer
Select a table to move customers to another table, then click Actions and Transfer/Merge.
In the floor plan view, choose the target table:
Select a free table to transfer customers and their orders.
Select an occupied table to merge customers and their orders.
更多内容