Theming
After your development environment is fully set up, you can start building the skeleton of your
theme module. In this chapter, you will discover how to:
Enable/disable the Website Builder’s standard options and templates.
Define the colors and fonts to use for your design.
Get the most out of Bootstrap variables.
Add custom styles and JavaScript.
Theme module
Odoo comes with a default theme that provides minimal structure and layout. When you create a new
theme, you are extending the default theme.
Remember to add the directory containing your module to the addons-path command-line argument
when running Odoo in your development environment.
Technical naming
The first step is to create a new directory.
注解
Prefix it with website_ and use only lowercase ASCII alphanumeric characters and underscores.
In this documentation, we will use Airproof (a fictional project) as an example.
File structure
Themes are packaged like any Odoo module. Even if you are designing a basic website, you need to
package its theme like a module.
website_airproof
├── data
├── i18n
├── static
│   ├── description
│   ├── fonts
│   ├── lib
│   ├── shapes // Shapes for background
│   └── src
│       ├── img
│       │   ├── content // For those used in the pages of your website
│       │   └── wbuilder // For those used in the builder
│       ├── js
│       ├── scss // Theme specific styles
│       └── snippets // custom snippets
├── views
├── __init__.py
└── __manifest__.py
Folder |
Description |
|---|
data |
Presets, menus, pages, images, shapes, … (*.xml) |
|---|
i18n |
Translations (*.po, *.pot) |
|---|
lib |
External libraries (*.js) |
|---|
static |
Custom assets (*.jpg, *.gif, *.png, *.svg, *.pdf, *.scss, *.js) |
|---|
views |
Custom views and templates (*.xml) |
|---|
Initialization
An Odoo module is also a Python package with a __init__.py file containing import
instructions for various Python files in the module. This file can remain empty for now.
Declaration
An Odoo module is declared by its manifest file. This file declares a Python package as an Odoo
module and specifies the module’s metadata. It must at least contain the name field, which is
always required. It usually contains much more information.
/website_airproof/__manifest__.py
{
   'name': 'Airproof Theme',
   'description': '...',
   'category': 'Website/Theme',
   'version': '18.0.0',
   'author': '...',
   'license': '...',
   'depends': ['website'],
   'data': [
      # ...
   ],
   'assets': {
      # ...
   },
}
Field |
Description |
|---|
name |
Human-readable name of the module (required) |
|---|
description |
Extended description of the module, in reStructuredText |
|---|
category |
Classification category within Odoo |
|---|
version |
Odoo version this module is addressing |
|---|
author |
Name of the module author |
|---|
license |
By default, we use the LGPL-3 license. More information in the module manifest page. |
|---|
depends |
Odoo modules must be loaded before this one, either because this module uses features
they create or because it alters resources they define |
|---|
data |
List of XML files |
|---|
assets |
List of SCSS and JS files |
|---|
注解
The file structure above is just a suggestion. We could add as many other folders as needed in
the project, such as /controllers to include controllers or /views/backend for backend
views, etc.
To create a website theme, you only need to install the Website app. If you need other apps
(Blogs, Events, eCommerce, …), you can also add them.
Odoo version and major number are mandatory. However, patch number is optional. If you want
to specify the required version of Odoo to run your module, you should use a five arguments
structure, using the first two arguments to indicate your current Odoo version (* = 18.0).
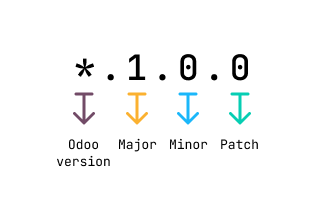
Example:
18.0.1.0.0
odoo_major.odoo_minor.module_major.module_minor.module_patch
警告
Automated file inclusion using wildcard notations (ex.: /myfolder/*.scss) doesn’t work in
Odoo SaaS databases. In this case, include each file manually in the manifest.
Default options
First, try to construct your theme by using Odoo’s default options. This ensures two things:
You do not re-invent something which already exists. For example, as Odoo provides an option to
add a border on the footer, you shouldn’t recode it yourself. Instead, enable the default option
first, then extend it if needed.
The user can still use all of Odoo’s features with your theme. For example, if you recode the
border on the footer, you may break the default option or make it useless, giving the user a bad
experience. Also, your recode might not work as well as the default option, as other Odoo
features may rely on it.
Odoo variables
Odoo declares many CSS rules, most entirely customizable by overriding the related SCSS variables.
To do so, create a primary_variables.scss file and add it to the _assets_primary_variables
bundle.
Declaration
/website_airproof/__manifest__.py
'assets': {
   'web._assets_primary_variables': [
      'website_airproof/static/src/scss/primary_variables.scss',
   ],
},
By reading the source code, variables related to options are easily noticeable.
<we-button title="..."
   data-name="..."
   data-customize-website-views="..."
   data-customize-website-variable="'Sidebar'"
   data-img="..."/>
These variables can be overridden through the $o-website-value-palettes map, for example.
Global
Declaration
/website_airproof/static/src/scss/primary_variables.scss
$o-website-values-palettes: (
   (
      // Templates
      // Colors
      // Fonts
      // Buttons
      // ...
   ),
);
小技巧
That file must only contain definitions and overrides of SCSS variables and mixins.
Fonts
You can embed any font on your website. The Website Builder automatically makes them available in
the font selector.
Declaration
/website_airproof/static/src/scss/primary_variables.scss
$o-theme-font-configs: (
   <font-name>: (
      'family': <css font family list>,
      'url' (optional): <related part of Google fonts URL>,
      'properties' (optional): (
         <font-alias>: (
            <website-value-key>: <value>,
            ...,
         ),
      ...,
   )
)
Use
/website_airproof/static/src/scss/primary_variables.scss
$o-website-values-palettes: (
   (
      'font':                             '<font-name>',
      'headings-font':                    '<font-name>',
      'navbar-font':                      '<font-name>',
      'buttons-font':                     '<font-name>',
   ),
);
Google fonts
/website_airproof/static/src/scss/primary_variables.scss
$o-theme-font-configs: (
   'Poppins': (
      'family':                         ('Poppins', sans-serif),
      'url':                            'Poppins:400,500',
      'properties' : (
         'base': (
            'font-size-base':           1rem,
         ),
      ),
   ),
);
Custom fonts
First, create a specific SCSS file to declare your custom font(s).
/website_airproof/__manifest__.py
'assets': {
   'web.assets_frontend': [
      'website_airproof/static/src/scss/font.scss',
   ],
},
Then, use the @font-face rule to allow you custom font(s) to be loaded on your website.
/website_airproof/static/src/scss/font.scss
@font-face {
   font-family: "My Custom Font", Helvetica, Helvetica Neue, Arial, sans-serif;
   font-weight: 400;
   font-style: normal;
   src: url('/fonts/my-custom-font.woff') format('woff'),
        url('/fonts/my-custom-font.woff2') format('woff2');
}
/website_airproof/static/src/scss/primary_variables.scss
$o-theme-font-configs: (
   'Proxima Nova': (
      'family':                         ('Proxima Nova', sans-serif),
      'properties' : (
         'base': (
            'font-size-base':           1rem,
         ),
      ),
   ),
);
小技巧
It is recommended to use the .woff and/or .woff2 format for your fonts.
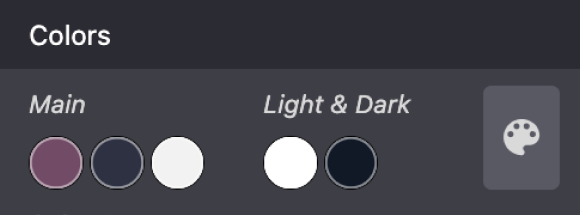
Colors
The Website Builder relies on palettes composed of five named colors. Defining those in your theme
ensures it stays consistent.
Color |
Description |
|---|
o-color-1 |
Primary |
|---|
o-color-2 |
Secondary |
|---|
o-color-3 |
Extra (Light) |
|---|
o-color-4 |
Whitish |
|---|
o-color-5 |
Blackish |
|---|
Declaration
/website_airproof/static/src/scss/primary_variables.scss
$o-color-palettes: map-merge($o-color-palettes,
   (
      'airproof': (
         'o-color-1':                    #bedb39,
         'o-color-2':                    #2c3e50,
         'o-color-3':                    #f2f2f2,
         'o-color-4':                    #ffffff,
         'o-color-5':                    #000000,
      ),
   )
);
Add the created palette to the list of palettes offered by the Website Builder.
$o-selected-color-palettes-names: append($o-selected-color-palettes-names, 'airproof');
Use
/website_airproof/static/src/scss/primary_variables.scss
$o-website-values-palettes: (
   (
      'color-palettes-name':              'airproof',
   ),
);
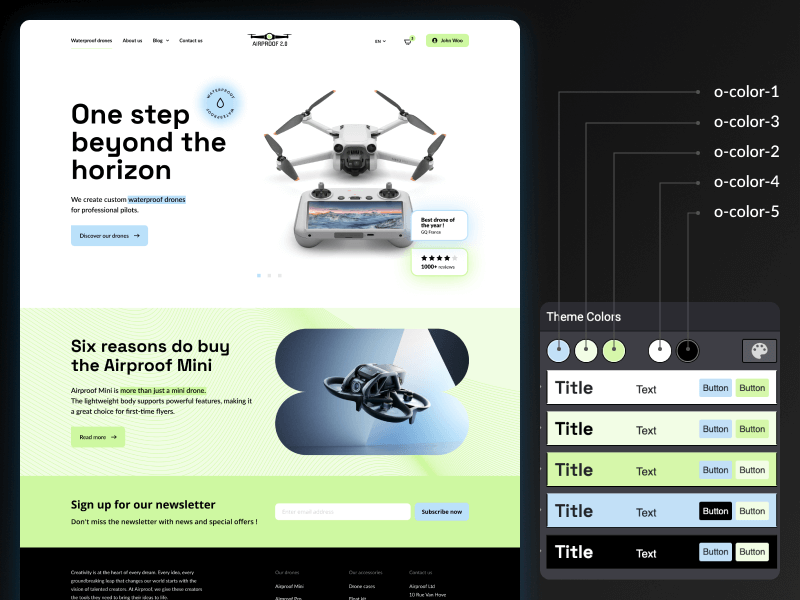
Color combinations
Based on the previously defined five color palettes, the Website Builder automatically generates
five color combinations, each defining a color for the background, text, headings, links, primary
buttons, and secondary buttons. These colors can be customized later by the user.
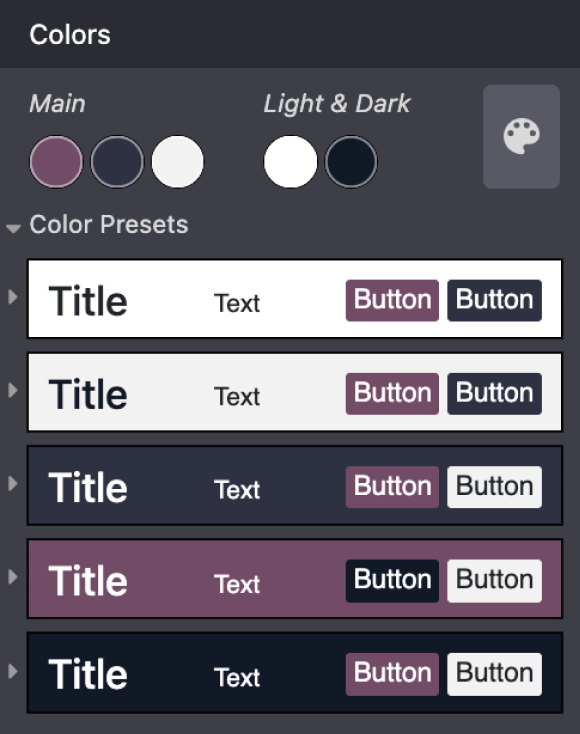
The colors used in a color combination are accessible and can be overridden through
$o-color-palettes using a specific prefix (o-cc for color combination).
/website_airproof/static/src/scss/primary_variables.scss
$o-color-palettes: map-merge($o-color-palettes,
   (
      'airproof': (

         'o-cc*-bg':                     'o-color-*',
         'o-cc*-text':                   'o-color-*',
         'o-cc*-headings':               'o-color-*',
         'o-cc*-h2':                     'o-color-*',
         'o-cc*-h3':                     'o-color-*',
         'o-cc*-h4':                     'o-color-*',
         'o-cc*-h5':                     'o-color-*',
         'o-cc*-h6':                     'o-color-*',
         'o-cc*-link':                   'o-color-*',
         'o-cc*-btn-primary':            'o-color-*',
         'o-cc*-btn-primary-border':     'o-color-*',
         'o-cc*-btn-secondary':          'o-color-*',
         'o-cc*-btn-secondary-border':   'o-color-*',

      ),
   )
);
注解
For each o-cc*, replace the * with the digit (1 - 5) corresponding to the desired color
combination.
The default text color is o-color-5. If the background is too dark, it will automatically
change to the o-color-4 color.
Demo page
The Website Builder automatically generates a page to view the color combinations of the theme
color palette: http://localhost:8069/website/demo/color-combinations
Gradients
You can also define gradients for the menu, header, footer and copyright bar, directly in your
primary_variables.scss file.
Declaration
/website_airproof/static/src/scss/primary_variables.scss
$o-website-values-palettes: (
   (
      'menu-gradient': linear-gradient(135deg, rgb(203, 94, 238) 0%, rgb(75, 225, 236) 100%),
      'header-boxed-gradient': [your-gradient],
      'footer-gradient': [your-gradient],
      'copyright-gradient': [your-gradient],
   ),
);
Bootstrap variables
Odoo includes Bootstrap by default. You can use all variables and mixins of the framework.
If Odoo does not provide the variable you are looking for, there could be a Bootstrap variable that
allows it. Indeed all Odoo layouts respect Bootstrap structures and use Bootstrap components or
their extensions. If you customize a Bootstrap variable, you add a generic style for the whole user
website.
Use a dedicated file added to the _assets_frontend_helpers bundle to override Bootstrap
values and not the primary_variables.scss file.
Declaration
/website_airproof/__manifest__.py
'assets': {
   'web._assets_frontend_helpers': [
      ('prepend', 'website_airproof/static/src/scss/bootstrap_overridden.scss'),
   ],
},
Use
/website_airproof/static/src/scss/bootstrap_overridden.scss
// Typography
$h1-font-size:                 4rem !default;

// Navbar
$navbar-nav-link-padding-x:    1rem!default;

// Buttons + Forms
$input-placeholder-color:      o-color('o-color-1') !default;

// Cards
$card-border-width:            0 !default;
小技巧
That file must only contain definitions and overrides of SCSS variables and mixins.
警告
Don’t override Bootstrap variables that depend on Odoo variables. Otherwise, you might break the
possibility for the user to customize them using the Website Builder.
When an option is defined by a variable in primary_variables.scss and by a Boostrap variable,
you should always go for an override through the primary variables. Do it via
bootstrap_overridden.scss only if nothing exists in the primary variables.
Font sizes
Odoo has CSS font size classes to separate style (font sizes) and semantic (tag and styles in
general). Both logic can be combined to be more flexible.
Text style
Odoo’s Website Builder allows to select a style for your text. Some are just tag related like the
Header with no extra CSS class. Other combine tag and style directly applied on them like the
Header 1 Display.

<!-- h1 with display heading sizes -->
<h1 class="display-1">Heading 1 with Display Heading 1 size</h1>
<h1 class="display-2">Heading 1 with Display Heading 2 size</h1>
<h1 class="display-3">Heading 1 with Display Heading 3 size</h1>
<h1 class="display-4">Heading 1 with Display Heading 4 size</h1>

<!-- Lead text - named "Light" in the dropdown -->
<p class="lead">A text typically used as an introduction.</p>

<!-- Small text -->
<p class="o_small">Body text with a smaller size.</p>
Sizing classes
The sizing classes are added on a freshly created span tag inside the targeted element (See
examples below).

Heading and body text
Assuming these classes can be applied on any text element, take h2 as an example below:
<!-- h2 sized like an h1 -->
<h2><span class="h1-fs">Heading</span></h2>

<!-- h2 sized with other heading sizes -->
<h2><span class="h2-fs">Heading</span></h2>
<h2><span class="h3-fs">Heading</span></h2>
<h2><span class="h4-fs">Heading</span></h2>
<h2><span class="h5-fs">Heading</span></h2>
<h2><span class="h6-fs">Heading</span></h2>

<!-- h2 sized like a normal paragraph (base size, 16px by default) -->
<h2><span class="base-fs">Heading</span></h2>

<!-- h2 sized like a small text (14px by default) -->
<h2><span class="o_small-fs">Heading</span></h2>
Display headings
If larger titles are needed, Odoo uses Bootstrap’s Display Headings classes, from display-1 to 6.
<h2><span class="display-1-fs">Heading</span></h2>
<h2><span class="display-2-fs">Heading</span></h2>
<h2><span class="display-3-fs">Heading</span></h2>
<h2><span class="display-4-fs">Heading</span></h2>
注解
The Website Builder allows the user to configure only sizes from Display 1 to Display 4. You
can set the other sizes (5 and 6) to use them in your code but the user won’t be able to
modify them directly within the Website Builder interface.
Website settings
Global options related to the website can be set through the website record by following the
structure below.
Declaration
/website_airproof/data/website.xml
<?xml version="1.0" encoding="utf-8"?>
<odoo noupdate="1">
   <record id="website.default_website" model="website">
      <field name="name">Airproof</field>
      <field name="logo" type="base64" file="website_airproof/static/src/img/content/logo_pred.png"/>
      <field name="favicon" type="base64" file="website_airproof/static/description/favicon.png" />
      <field name="shop_ppg">18</field>
      <field name="shop_ppr">3</field>
      <field name="cookies_bar" eval="True" />
      <field name="contact_us_button_url">/contact-us</field>
      <field name="social_facebook">https://www.facebook.com/Airproof</field>
      <field name="social_instagram">https://www.instagram.com/airproof</field>
      <field name="social_linkedin">https://www.linkedin.com/company/airproof</field>
      <field name="social_youtube">https://www.youtube.com/c/airproof</field>
   </record>
</odoo>
Field |
Description |
|---|
name |
Name of the website (displayed in the browser) |
|---|
logo |
Path to the logo (previously created into a record) |
|---|
favicon |
Path to the favicon (previously created into a record) |
|---|
shop_ppg |
Number of products shown per page in the e-commerce |
|---|
shop_ppr |
Number of products shown per rows (in a page) in the e-commerce |
|---|
cookies_bar |
Enable/disable the cookies bar |
|---|
contact_us_button_url |
URL of the Contact us page (For instance, used in the standard header templates). |
|---|
social_facebook |
URL of a Facebook profile |
|---|
social_instagram |
URL of a Instagram profile |
|---|
social_linkedin |
URL of a LinkedIn company profile |
|---|
social_youtube |
URL of a YouTube channel |
|---|
注解
website.default_website is the default reference whenever you work with only one website. If
there are several websites in your database, this record will refer to the default site (the
first one).
Views
For some options, in addition to the Website Builder variable, you also have to activate a specific
view.
By reading the source code, templates related to options are easily found.
<we-button title="..."
   data-name="..."
   data-customize-website-views="website.template_header_default"
   data-customize-website-variable="'...'"
   data-img="..."/>
<template id="..." inherit_id="..." name="..." active="True"/>
<template id="..." inherit_id="..." name="..." active="False"/>
Presets
In order to activate and deactivate views as presets, you should include those inside the
presets.xml file.
Use
/website_airproof/data/presets.xml
<record id="module.view" model="ir.ui.view">
      <field name="active" eval="False"/>
</record>
Example
Changing the menu items’ horizontal alignment
/website_airproof/data/presets.xml
<record id="website.template_header_default_align_center" model="ir.ui.view">
   <field name="active" eval="True"/>
</record>
The same logic can be used for others Odoo apps as well.
eCommerce - Display products categories
/website_airproof/data/presets.xml
 <record id="website_sale.products_categories" model="ir.ui.view">
    <field name="active" eval="False"/>
 </record>
Portal - Disable the language selector
/website_airproof/data/presets.xml
<record id="portal.footer_language_selector" model="ir.ui.view">
   <field name="active" eval="False"/>
</record>
Assets
For this part, we will refer to the assets_frontend bundle located in the web module. This bundle
specifies the list of assets loaded by the Website Builder, and the goal is to add your SCSS and JS
files to the bundle.
This is a non-exhaustive list of the frequently used bundles for a website:
Bundle |
Description |
|---|
web._assets_primary_variables |
Mainly used for the primary_variables.scss file |
|---|
web._assets_secondary_variables |
Mainly used for the secondary_variables.scss file |
|---|
web._assets_frontend_helpers |
Mainly used for the bootstrap_overridden.scss file |
|---|
web.assets_frontend |
You can add all your custom SCSS, JS or QWeb JS files |
|---|
website.assets_wysiwyg |
Add your JS files related to the Website Builder options behaviors (for instance, a custom
method for your custom building block) |
|---|
website.assets_wysiwyg |
If you need to extend Boostrap through the Bootstrap Utilities API, for example |
|---|
Styles
The Website Builder together with Bootstrap are great for defining the basic styles of your website.
But to design something unique, you should go a step further. For this, you can easily add any SCSS
file to your theme.
Declaration
/website_airproof/__manifest__.py
'assets': {
   'web.assets_frontend': [
      'website_airproof/static/src/scss/theme.scss',
   ],
},
Feel free to reuse the variables from your Bootstrap file and the ones used by Odoo in your
theme.scss file.
Example
/website_airproof/static/src/scss/theme.scss
 blockquote {
   border-radius: $rounded-pill;
   color: o-color('o-color-3');
   font-family: o-website-value('headings-font');
 }
Interactivity
Odoo supports three different kinds of JavaScript files:
Most new Odoo JavaScript codes should use the native JavaScript module system. It’s simpler and
brings the benefit of a better developer experience with better integration with the IDE.
Declaration
/website_airproof/__manifest__.py
'assets': {
   'web.assets_frontend': [
      'website_airproof/static/src/js/theme.js',
   ],
},
注解
If you want to include files from an external library, you can add them to the /lib
folder of your module.
小技巧
Use a linter (JSHint, …).
Never add minified JavaScript libraries.
Add 'use strict'; at the top of every old-style module (this is automatic for new-style
modules).
Use js_ prefixed CSS classes on elements you target with JavaScript.
Variables and functions should be camelCased (myVariable) instead of snake_cased
(my_variable).
Do not name a variable event; use ev instead. This is to avoid bugs on non-Chrome
browsers, as Chrome is magically assigning a global event variable (so if you use the
event variable without declaring it, it will work fine on Chrome but crash on every other
browser).
Use strict comparisons (=== instead of ==).
Use double quotes for all textual strings (such as "Hello") and single quotes for all other
strings, such as a CSS selector .x_nav_item.
If you’re using native standard JS functions (start(), willStart(), cleanForSave(),
etc), make sure you call this._super.apply(this, arguments); (Check if it’s necessary in the
standard code).