报价请求
Odoo’s requests for quotation (RFQs) feature in the Purchase app standardizes ordering products from multiple vendors with varying prices and delivery times.
RFQs are documents companies send to vendors requesting product pricing. In Odoo, once the vendor approves the RFQ, the purchase order (PO) is confirmed to align on lead times and pricing.
配置
产品
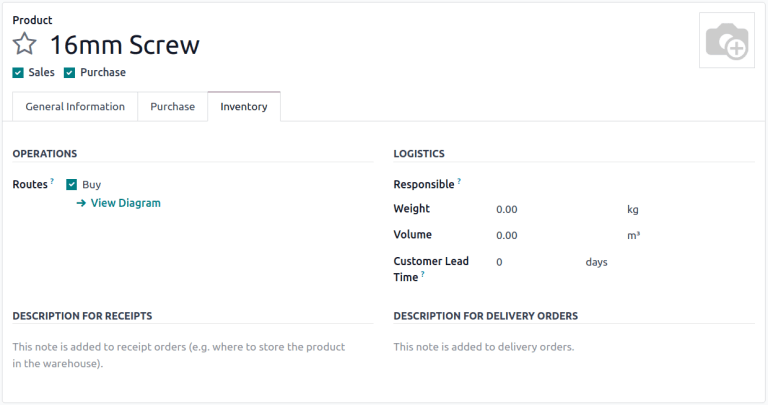
To auto-populate product information and prices on an RFQ, configure products by going to . Select an existing product, or create a new one by selecting New. Doing so opens the product form, where sales and purchasing data can be configured.
To configure purchasable products, tick the Purchase checkbox, under the product name. Next, go to the Inventory tab, and enable the Buy route.
重要
The Inventory tab and routes are only visible if using the Inventory app.
Vendor pricelist
In the Purchase tab of the product form, click Add a line to input the vendor and their price, to have this information auto-populate on an RFQ each time the product is listed.
更多内容
Default columns include Quantity, Unit Price, and Delivery Lead Time, but other columns like, Vendor Product Code or Discount (%), can also be enabled.
To enable or disable columns, click the (additional options) icon on the right side of the header row to reveal a drop-down menu of additional columns that can be added (or removed) from the Purchase tab.
注解
Alternatively, prices and delivery lead times for existing products can be added by going to . Click New in the top-left corner. In the Vendor section of the pricelist form that appears, add the product information as it pertains to the vendor.
Order products
With products and prices configured, follow these steps to create and send RFQs to make purchases for the company.
RFQ dashboard
To get started, navigate to .
The Requests for Quotation dashboard displays an overview of the company’s RFQs, POs, and their status. The top of the screen breaks down all RFQs in the company, as well as individual ones (where the user is the buyer) with a summary of their status.
The top-right corner also provides a report of the company’s recent purchases by total value, lead times, and number of RFQs sent.
Additionally, the dashboard includes buttons for:
To Send: orders in the RFQ stage that have not been sent to the vendor.
Waiting: RFQs that have been sent by email, and are waiting on vendor confirmation.
Late: RFQs or POs where the Order Deadline has passed.
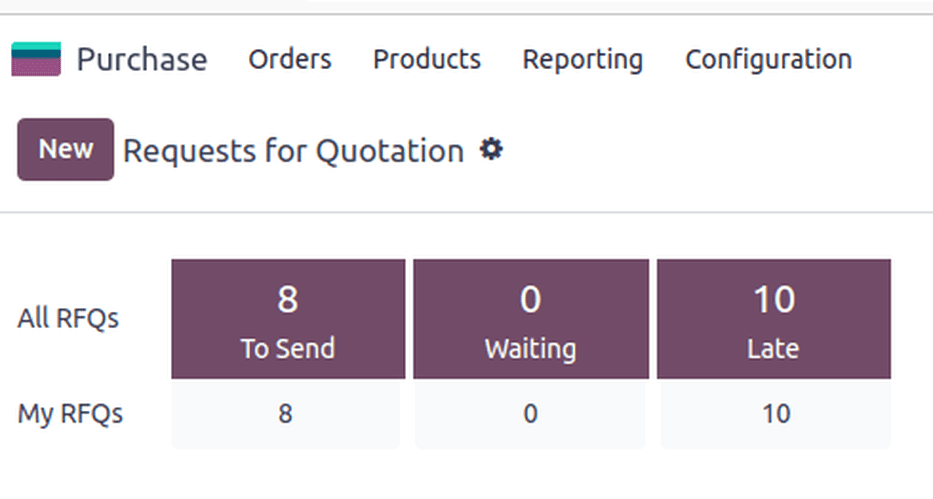
In addition to view options, the Requests for Quotation dashboard provides Filters and Group By options, accessible via the search bar drop-down menu.
更多内容
Create a new RFQ
To create a new RFQ, click the New button on the top-left corner of the Requests for Quotation dashboard to reveal a new PO form.
Start by assigning a Vendor.
The Vendor Reference field points to the sales and delivery order numbers sent by the vendor. This comes in handy once products are received, and the PO needs to be matched to the delivery order.
With the Purchase Agreements feature activated, the Blanket Order field appears, referring to long-term purchase agreements on recurring orders with set pricing. To view and configure blanket orders, head to .
重要
The Purchase agreements view only appears if the Blanket Order setting is enabled. To do so, navigate to , then tick the Blanket Orders checkbox.
Next, configure an Order Deadline, which is the date by which the vendor must confirm their agreement to supply the products.
注解
After the Order Deadline is exceeded, the RFQ is marked as late, but the products can still be ordered.
Expected Arrival is automatically calculated based on the Order Deadline and vendor lead time. Tick the checkbox for Ask confirmation to ask the vendor to confirm the shipping date by email.
With the Storage Locations feature activated, the Deliver to field appears, which specifies which warehouse operation (set in the Inventory app) is used to receive the shipment.
在此选择收货仓库地址,或选择 直运 来表明此订单将直接发货给最终客户。当选择 直运 时,直运地址 字段将被启用。联系人姓名会从 联系人 应用程序中自动填充到此处。
重要
The Dropship options only appear if the Dropshipping setting is enabled in the Inventory app. To do so, navigate to , then tick the Dropshipping checkbox.
小技巧
To create RFQs using different currencies, each currency needs to be enabled in the Invoicing app settings. See Foreign currencies to learn more.
产品选项卡
在 产品 标签中,添加要订购的产品。点击 添加产品,输入产品名称,或从下拉菜单中选择项目。
To create a new product and add it, type the new product name in the Product column, select Create [product name] from the resulting drop-down menu and manually add the unit price. Alternatively, select Create and edit… to be taken to the product form for that new item.
还可选择 目录 浏览所选供应商的产品菜单。从这里可以将产品添加到购物车。
注解
要调整产品和价格,请点击 :icon:`oi-arrow-right`(右箭头) :guilabel:`(右箭头)` 图标进入产品表单。
Send the RFQ
点击 通过电子邮件发送,弹出 撰写电子邮件`窗口,其中包含一个 :guilabel:`采购:请求报价 模板已加载,准备发送到供应商的电子邮件地址(在**联系人**应用程序中配置)。
制作好所需信息后,点击 发送。发送后,RFQ 将进入 询价请求已发送 阶段。
点击 打印询价请求 可下载 PDF 格式的 RFQ。
更多内容
确认订单
点击 确认订单 可直接将 RFQ 转换为激活的 PO。
小技巧
Odoo 通过 PO 表单的聊天记录追踪每个订单的通信情况。这将显示用户与联系人之间发送的电子邮件,以及任何内部备注和活动。信息、备注和活动也可记录在聊天记录中。
一旦 RFQ 得到确认,就会创建一个 PO。
在新的 PO 中,订单截止日期 字段变为 确认日期,显示用户确认订单的日期和时间。
根据用户在 采购 应用程序设置中选择的配置,一旦订购或收到产品,就会创建 供应商账单。更多信息,请参阅 管理供应商账单 文档。
注解
下订单后,点击 接收产品 将记录数据库接收新产品的情况。
注解
安装**库存**应用程序后,确认|PO|会自动创建收货文件,并自动填充产品信息和预计到达日期。
更多内容