工作条目
根据员工的 薪资结构类型,薪酬管理 应用程序会自动创建工作条目,排期、考勤 和 休假 应用程序也会自动创建工作条目。
薪酬管理 应用程序的 工作条目 仪表板提供了每个员工的个人工作条目的可视化概述。
要打开仪表板,请导航至 。
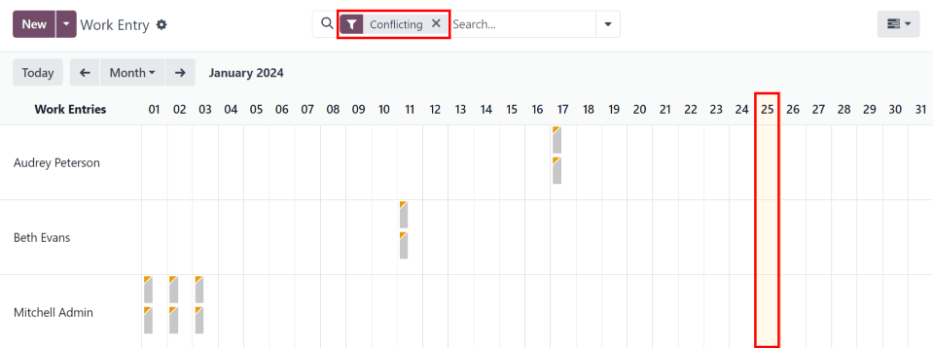
在 工作条目 仪表板上,工作条目按员工姓名的字母顺序显示。整个月份都会显示,当前日期以淡黄色突出显示。
如果任何条目有 冲突 需要解决,仪表盘默认只筛选 冲突 条目。
要从 搜索… 栏中移除筛选器以查看所有工作条目,请点击 ✖️ (移除)`图标,在 :guilabel:`搜索… 栏中的 冲突 筛选器上点击 :guilabel:`✖️ (移除)`图标,所有工作条目将出现在列表中。
要更改视图,以便只显示单日、单周或单月的条目,请点击 月。下拉菜单显示 日、:guilabel:`周`或 :guilabel:`月`选项。点击其中一个选项,只显示该特定选项的数据。
使用 ⬅️ (左箭头) 和 ➡️ (右箭头) 图标调整 月 按钮左右两侧显示的日期。箭头根据所选时间类型调整日期。
例如,如果选择 月,则每点击一次箭头,箭头移动一个月。如果选择了 周 或 日,则每点击一次箭头,时间就分别移动一周或一天。
要返回包含当前日期的视图,请点击 今天 按钮。
添加新的工作条目
如果缺少工作条目,需要添加,如病假时间,或员工忘记打卡上下班,请点击 工作条目 面板上的 新建,创建新的工作条目。
弹出 创建 工作条目表单。
在表格中输入以下信息:
描述:输入工作条目的简短描述,如
病假。如果此字段留空,则会在选择员工后自动填充。默认输入为出勤:(员工)。员工:使用下拉菜单选择工作条目对应的员工。
工作条目类型:使用下拉菜单选择 工作条目类型。
从 和 至:输入工作条目的开始(从)和结束(至)日期和时间。
首先,点击 由 或 至 行,弹出日历窗口。使用 < (左箭头) 和 > (右箭头) 图标导航到正确的年月日,选择日期,然后点击特定的日期。
接下来,点击日历底部的小时或分钟字段,选择时间,并为小时和分钟选择所需的时间。
当输入的日期和时间正确无误时,点击 应用 按钮。
Duration: displays the hours based on the To and From entries. Modifying this field modifies the To field (the From field does not change).
Once the desired information is entered, click Save & Close to save the entry, and close the pop-up form.

冲突
任何未获批准的申请(如病假或休假),或工作输入有任何错误(如必填字段留空),都会出现冲突。在生成工资单之前,必须解决冲突问题。
任何需要解决冲突的工作条目都会显示在主 工作条目 仪表板上,可通过导航至 访问。默认情况下只显示需要解决的冲突。
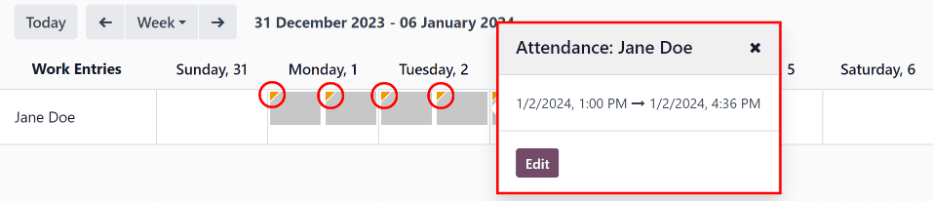
冲突会在每个工作条目的左上角显示一个橙色三角形。点击单个工作条目,可查看特定工作条目的日期和时间,然后点击 编辑 在弹出窗口中查看冲突详情。
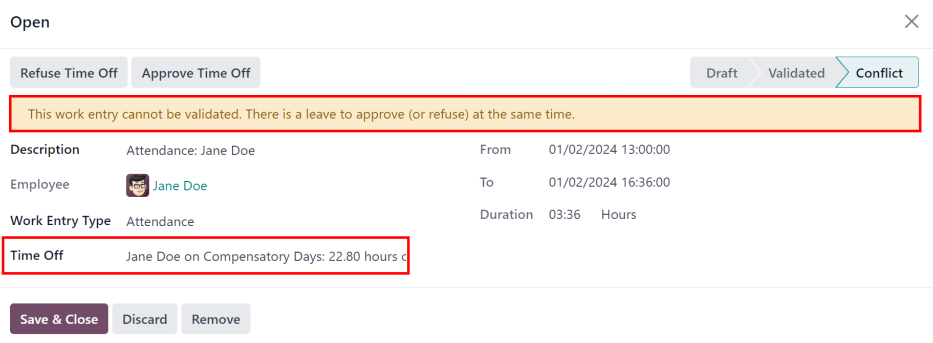
在弹出的 打开 窗口中,冲突会在橙色文本框中简要说明。
弹出窗口的左侧列出 描述、员工 和 工作条目类型。右侧显示 由 和 至 日期和时间范围,以及 持续时间 字段中的总时间(以小时为单位)。
如果冲突是由于尚未批准的休假申请造成的,则左侧会出现 休假 字段,并在描述中注明休假类型。
休假冲突
最常见的工作条目冲突是已提交但尚未批准的休假申请,这会导致该员工的工作条目重复(一个是休假,另一个是正常工作)。
如果系统中的休假申请与正常工作条目存在冲突,休假申请将输入 休假 字段。
请假冲突可以在工作输入弹出窗口或详细的请假申请弹出窗口中解决。
Resolve on work entry
To resolve the time off conflict on this work entry pop-up window, click the Approve Time Off button to approve the time off request, and resolve the work entry conflict.
The Approve Time Off and Refuse Time Off buttons disappear. Click the Save & Close button to close the pop-up window. The conflict disappears from the Work Entry dashboard, since the conflict is resolved.
Resolve on time off request
要在弹出的详细请假申请窗口中解决请假冲突,请点击 休假 输入行末尾的 内部链接 按钮,请假休假详情将出现在新的弹出窗口中。如有需要,可修改申请。
点击 批准 按钮批准请求,然后点击 保存并关闭 按钮保存更改,并返回工作条目冲突弹出窗口。
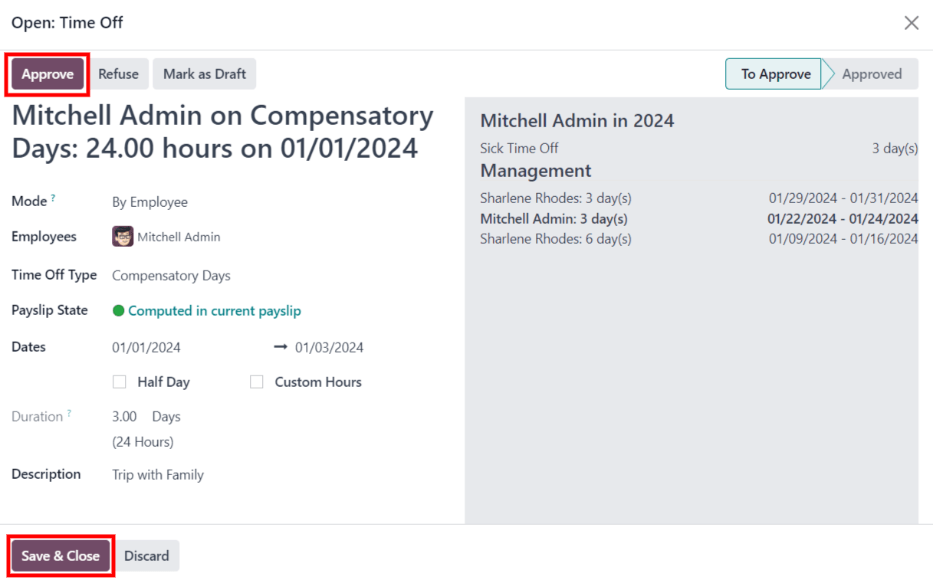
现在,隐藏了 批准休假 按钮,只有 拒绝休假 按钮可见。
如果审批有误,可点击 拒绝休假 按钮在此拒绝请求。
由于请假已在请假窗口中批准,请点击右上角的 X 关闭窗口。由于冲突已解决,冲突将从 工作条目 仪表板中消失。
重新生成工作条目
在重新生成工作条目时,任何手动更改(如已解决冲突)都会被覆盖,工作条目会从创建它们的应用程序中重新生成(或重新创建)。
This method for correcting a large amount of conflicts is recommended to keep all records correct. While conflicts can be resolved individually, if the conflicts are caused from another application, it is best practice to ensure the records in the other applications are also correct. That is why it is recommended to resolve these conflicts in the applications that created the conflict.
Another reason this method is recommended is because, when work entries are regenerated, the conflicts reappear, if the issue in the related application is not resolved.
First, ensure the issues are resolved in the specific applications that caused the work entry conflicts.
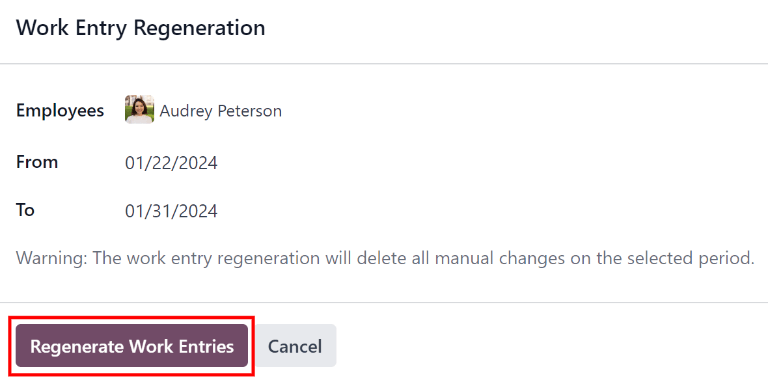
Next, click the Regenerate Work Entries button at the top of the Work Entries dashboard, and a Work Entry Regeneration pop-up window appears.
Select the Employees to regenerate work entries for from the drop-down menu, and adjust the From and To fields, so the correct date range is displayed.
Click the Regenerate Work Entries button, and the work entries are recreated. Once finished, the pop-up window closes.
Example
An employee has incorrect work entries generated from the Planning app because they were incorrectly assigned to two work stations simultaneously. This should be fixed in the Planning app, instead of the Payroll app.
To correct this issue, modify the employee’s schedule in the Planning app, so they are correctly assigned to only one work station. Then, in the Payroll app, regenerate work entries for that employee, for that specific time period.
The Payroll app then pulls the new, corrected data form the Planning app, and recreates the correct work entries for that employee. All conflicts for that employee are now resolved.
Generating payslips
To generate payslips, navigate to the time period the payslips should be generated for. Ensure the Conflicting filter is removed. When the desired pay period is displayed, click the Generate Payslips button.
小技巧
If the Generate Payslips button is not active (appears pale purple, instead of dark purple), that indicates there are conflicts, or the date selected includes dates in the future. Resolve all conflicts before generating payslips.
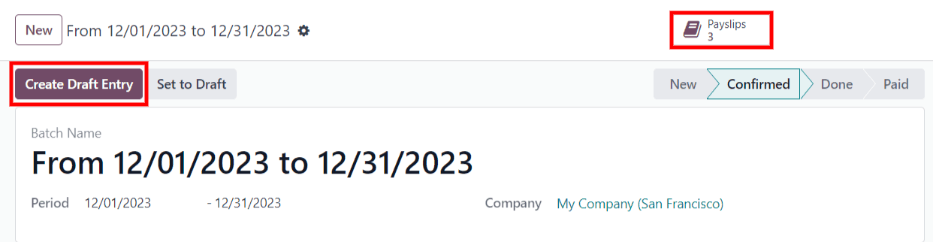
When the Generate Payslips button is clicked, a batch entry appears on a separate page for the time period selected.
The batch name populates the Batch Name field in a default From (date) to (date)
format.
The date range to which the payslips apply appears in the Period field, and the company appears in the Company field. It is not possible to make changes to this form.
Click the Create Draft Entry button to create the payslips for the batch.
Click the Payslips smart button at the top of the page to view all the payslips for the batch.
Printing payslips
To print payslips, first view the individual payslips by clicking the Payslips smart button on the batch form.
Next, select the payslips to print from the Payslips list. Click the box next to each payslip to print, or click the box to the left of the Reference column title, to select all the payslips in the list at once.
Click the Print button, and a PDF file is created with all the specified payslips.

注解
The Print button does not appear until at least one payslip is selected in the list.
Time off to report
如果提交的休假申请涉及的时间段已在工资单上处理过,则休假申请会出现在 薪酬管理 应用程序中的 休假 页面,可通过导航至 进行访问。
在 休假 页面上,请求的状态为 推迟到下一张工资单。这是因为该员工已领取了当天的工资,并已将当日记录为常规工作日。
为了保持员工的请假余额正确无误,休假申请 必须 应用于下一个薪资期。这不仅能确保休假申请的余额是最新的,还能避免重做工作分录、取消工资单和重新发放工资单。
发生这种情况的最常见情况是,在工资期结束前一两天处理工资单,并且员工在工资期最后一天意外生病。员工提出了休假申请,要求休假一天,该休假申请已在工资单上作为正常工作日进行处理。 Odoo 支持将这些休假请求应用于下一个发薪期,而不是取消工资单、修改工作条目和重新发放工资。
要查看所有需要推迟到下一张工资单的休假申请,请导航至 。该报告的默认筛选器是 推迟。
All time off requests that need to be applied to the following pay period appear with a Payslip State of To defer to next payslip.

推迟多次休假
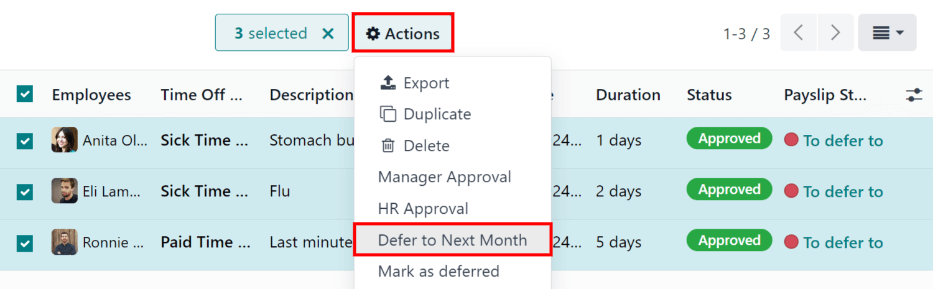
要选择待推迟的工作条目,请点击工作条目行左侧的方框。要选择列表中的所有工作条目,请点击列表顶部 员工 列标题左侧的方框。
选中任何工作条目后,报告顶部会出现两个按钮:(#) 已选 按钮和 操作 按钮。(#)已选 按钮表示当前有多少条目被选中。
选中所有所需的工作条目后,点击 操作 按钮,出现一个菜单,其中有几个选项。点击列表中的 推迟到下个月,所有选中的条目将推迟到下个月。
Defer individual time off entries
Time off requests appearing on the Time Off to Report list can be deferred individually.
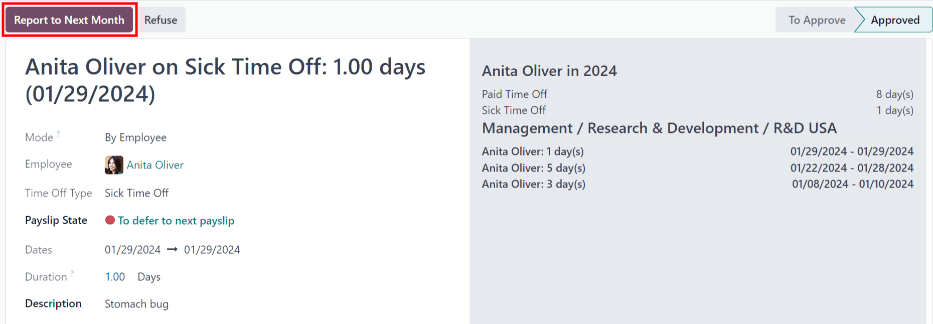
Click on an individual time off request, and the details for that request load.
The specific details for the time off request appear on the left-hand side, and all of the employee’s submitted time off requests appear on the right-hand side (including the request in the details on the left-hand side).
To defer the time off request to the next payslip, click the Report to Next Month button at the top. Once processed, the Report to Next Month button disappears, and the Payslip State changes from To defer to next payslip to Computed in Current Payslip.
To go back to the Time Off to Report list, click on Time Off in the breadcrumb menu.
更多内容