Sales calls with VoIP
Using VoIP increases call efficiency, reduces costs, and allows a salesperson to access the Odoo database while on a call. Instead of relying on a separate phone for sales calls, a salesperson can make calls directly from the Odoo database.
This article goes over setting up Odoo VoIP for a sales team that already has VoIP configured. If VoIP is not configured, refer to the configure VoIP documentation to get started.
Make a sales call
This workflow begins in the CRM app. As a salesperson, click into a sales opportunity. If it does not already have a call activity scheduled, click Activities in the opportunity’s chatter, then set the activity’s Activity Type to Call, and then fill out the rest of the activity form, and finally click Schedule.
From here, there are three ways to begin a phone call with the customer:
Hover over the Phone field in the opportunity form, then click Call.
In the opportunity’s chatter, click the customer’s phone number.
In the upper-right corner, click the (VoIP) icon to open the VoIP widget. From the Next Activities tab, select the call, and finally click the (phone) icon near the bottom of the widget.
Work during a call
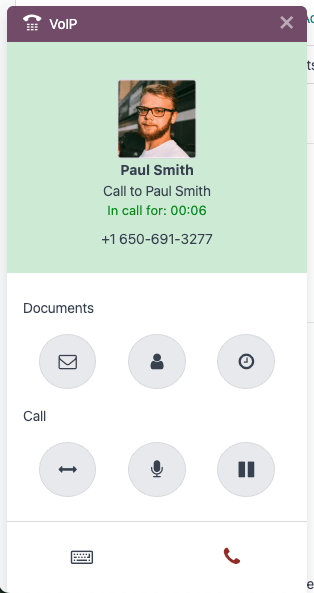
Once the call with the customer begins, the salesperson can still move about the Odoo database. Also, there are shortcut icons in the VoIP widget that the salesperson can use to access common actions, like sending an email to the customer, or pulling up their profile. Learn more about the documents a salesperson can access during a call.
The salesperson can also take some actions during the call:
(transfer): Transfer a call to another team member.
(microphone): The salesperson can mute themselves during a call.
(pause): Place the caller on hold.

Handle call follow-ups
The VoIP widget can handle some common follow-up tasks, but salespeople can still navigate Odoo for tasks not available in the widget.
Here are some of the common follow-up tasks that can be managed from the VoIP widget:
Send a follow-up email sharing new product offerings to the customer using the (envelope) icon.
Update the customer’s mailing address by clicking on the (user) icon, which opens their profile.
Schedule a second call with the customer by clicking the (clock) icon, setting the Activity Type field to Call, and then filling out the rest of the form.
Send a quotation while on a call
If the customer is ready to see a sales quotation while on the call, the salesperson can send that quotation without leaving the call.
To send a quotation while on a call, the salesperson should be in the sales opportunity they initiated the call from. From here, they will send the quotation as they normally would.
An added benefit of being on the call with the customer while the salesperson is sending the quotation is that any specific questions are answered in real-time.
End the sales call
When it is time to end the call, the salesperson clicks the red (phone) icon in the lower-right corner of the VoIP widget. When they do, the call is logged in the opportunity’s chatter.
If they have not done so already, the salesperson then marks the phone call activity as done. To do so, navigate to the opportunity’s chatter and find the Planned Activities section, then click Mark Done on the planned call to remove it from the Next Activities tab in the VoIP widget.
