帮助中心
Odoo 服务台**与**论坛、**在线学习**和**知识**应用程序集成,创建了*帮助中心*。*帮助中心*是一个整合的位置,团队和客户可在此搜索和共享有关产品和服务的详细信息。
配置
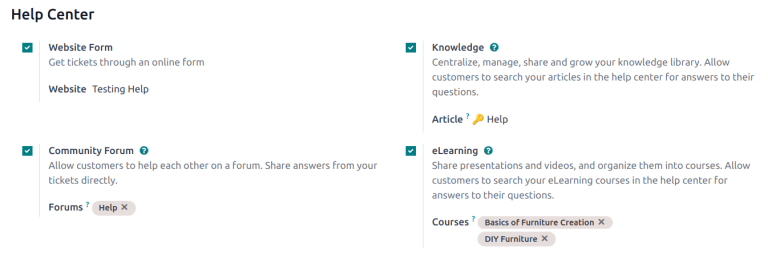
要在*服务台*团队中激活任何*帮助中心*功能,请进入 并选择一个团队,或创建一个 新 团队。在 可见性和分配 部分,确认团队的 可见性 设置为 邀请的门户用户和所有内部用户(公共)。
此外,要激活任何*帮助中心*功能,必须启用*帮助中心*团队表单上的 网站表单 选项。启用一项或多项*帮助中心*功能后,:guilabel:`网站表单`也会自动启用。
危险
由于 帮助中心 所有功能都需要与其他应用程序整合,因此启用其中任何一项功能,都可能需要安装额外模块或应用程序。
在 单一应用程序免费 数据库上安装新应用程序将触发为期 15 天的试用。试用期结束时,如果 `付费订阅<https://www.odoo.com/pricing>`_**尚未**添加到数据库中,它将不再处于活动状态或无法访问。
更多内容
知识库
Odoo 知识库 应用程序是一个协作库,用户可在其中存储、编辑和共享信息。知识库 应用程序可用于向外部客户发布用户指南和 常见问题,同时也可用于内部协作共享文档。
点击 知识库(书签) 图标,即可在整个数据库中访问 **知识库**应用程序。
书签图标代表知识库应用程序。
在服务台团队启用知识库
要在 服务台 团队中启用 知识库 功能,请转到 ,然后选择一个团队,或创建一个 新 团队。
选择或创建一个团队后,Odoo 会显示该团队的详细表单。
在团队的详细表格中,向下滚动到 帮助中心 部分。然后,点击 知识库 旁边的方框,激活**知识库**功能。点击后,会出现一个标有 文章 的新字段。
点击 文章 字段会显示一个下拉菜单。起初,下拉菜单中只有一个名为 帮助 的选项,由 Odoo 默认提供。从下拉菜单中选择 帮助 即可选择该文章。
小技巧
要创建新文章,请进入 ,然后将光标停留在位于左侧边栏的 工作空间 部分标题旁边。将光标移至该处,会显示一个隐藏的 |加号|。
点击 |加号|,在 工作空间 中创建新文章。点击 共享`图标,然后滑动 :guilabel:`分享到网络 切换开关,直到显示 文章已发布。然后就可以将其添加到**服务台**团队。
一旦创建文章并将其分配给**服务台**团队,就可以通过**知识库**应用程序添加和组织内容。
更多内容
从服务台工单中搜索文章
当 服务台 团队成员试图解决工单问题时,可以通过**知识库**应用程序中的内容,搜索有关问题的更多信息。
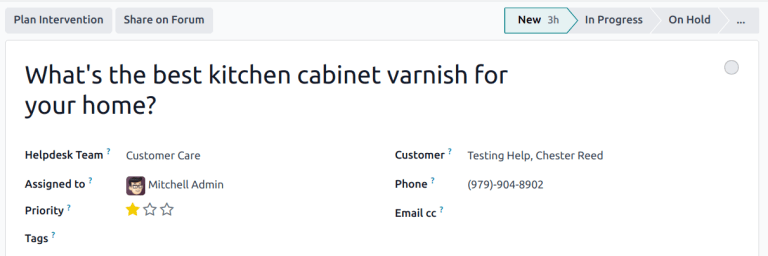
要搜索 知识库 文章,请从**服务台**应用程序仪表板或通过 打开一个工单,然后从列表中选择一个工单。
选择工单后,Odoo 会显示该工单的详细信息表单。
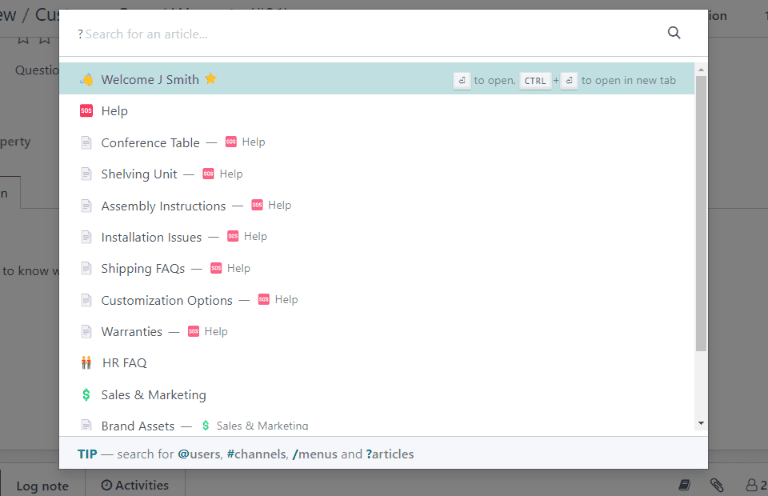
点击页面右上方的 知识库(书签) 图标,弹出搜索窗口。
小技巧
还可以按 Ctrl + K 键打开命令面板,然后输入 ?,接着输入所需文章的名称来搜索**知识库**文章。
当 Odoo 显示所需的文章时,点击它,或高亮显示 文章 标题,然后按 进入。这将在 知识库 应用程序中打开文章。
要在新标签页中打开文章,请按 Ctrl + Enter。
小技巧
如果需要更深入的搜索,请按 Alt+B。这将显示一个单独的页面,可以进行更详细的搜索。
分享文章到帮助中心
要向客户和网站访客提供**知识库**文章,**必须**发布该文章。
重要
即使在团队中启用了*帮助*文章,Odoo 也**不会**将所有嵌套文章共享到网络上。面向客户的单篇文章**必须**已发布,才能在网站上查看。
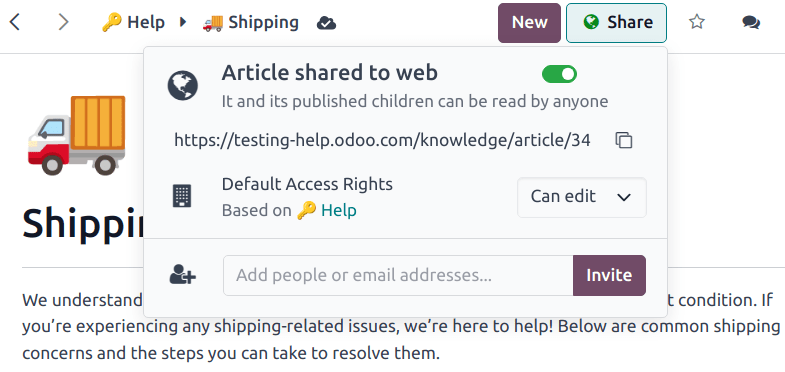
要发布文章,请按照上述步骤导航到所需文章,然后点击 :共享 图标。这将显示一个菜单。滑动标有 分享到网络 切换按钮,阅读 已发布文章。
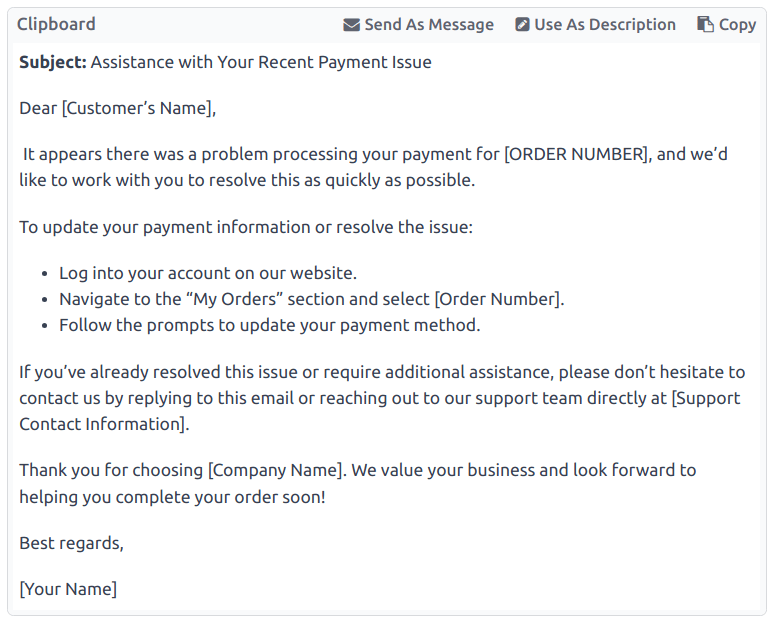
用剪贴板框解决工单问题
可在**知识库**文章中添加*剪贴板*框,以便重复使用、复制、作为消息发送或添加到工单的描述中。这样,团队在回答客户问题时就能保持一致性,并最大限度地减少回答重复问题所花费的时间。
将剪贴板框添加到文章中
要创建剪贴板框,请转到 。点击现有的嵌套文章,或点击*帮助*旁边的 |加号| 创建新文章。
输入 / 打开 powerbox,查看 指令 的下拉列表。选择或键入 剪贴板。页面中将添加一个灰色块。在此块中添加任何必要的内容。
注解
剪贴板框只有在直接从 服务台 访问时才会显示 用作说明 或 作为信息发送 选项。
在工单中使用剪贴板框
剪贴板框可用于直接以消息形式回复**服务台**工单,或在工单描述中添加信息。
要在 服务台 工单中使用剪贴板框,首先,从 服务台`仪表板或进入 :menuselection:`服务台应用程序 –> 工单 –> 所有工单 从列表中选择一个工单,打开一个工单。
点击右上角的 知识库 (书签) 图标。这将打开一个搜索窗口。在搜索窗口中,选择或搜索所需的文章。这样,Odoo **知识库**应用程序中的文章页面就会显示出来。
要使用剪贴板框回复工单,请点击位于文章正文中的剪贴板框右上角的 作为消息发送。
这样做将弹出 撰写电子邮件 窗口。在该窗口中,选择收件人,对剪贴板内容进行必要的添加或编辑,然后点击 发送。
小技巧
要使用剪贴板框为票单说明添加信息,请点击位于文章正文中的剪贴板框右上角的 用作描述。这样做**不会**取代工单描述中的现有文本。剪贴板框中的内容将作为附加文本添加。
社区论坛
社区论坛 为客户提供了一个相互解答问题和共享信息的空间。通过将论坛与 服务台 团队整合,可将客户提交的工单转换为帖子并进行共享。
启用服务台团队论坛
要在**服务台**团队中启用 社区论坛,首先导航到 ,然后选择一个团队,或创建一个 :doc:`新 <…/…/helpdesk>`团队。
选择或创建一个团队会显示该团队的详细表格。向下滚动到 帮助中心 功能部分,选中旁边的复选框,启用 社区论坛。
激活后,下方会出现一个标有 论坛 的新字段。
点击空白的 论坛 字段,显示一个下拉菜单。默认情况下,只有一个选项,标注为 帮助。这是启用 社区论坛 功能时 Odoo 自动创建的选项。从下拉菜单中选择 帮助 以启用该论坛。
要创建新论坛,请在空白的 论坛 字段中输入名称,然后点击 创建和编辑 选项。可在该字段中选择多个论坛。
更多内容
从服务台工单创建论坛帖文
When a Helpdesk team has a Forum enabled, tickets submitted to that team can be converted to forum posts.
要执行此操作,请从团队管道或 服务台 应用程序中的 选择工单。
在工单详情表单顶部,单击 在论坛上分享 按钮。
When clicked, a pop-up window appears. Here, the Forum post and Title can be edited to correct any typos, or modified to remove any proprietary or client information.
Tags can also be added to help organize the post in the forum, making it easier for users to locate during a search. When all adjustments have been made, click Create and View Post.
Create a Helpdesk ticket from a forum post
Forum posts submitted by portal users can be converted to Helpdesk tickets.
To create a ticket, navigate to a forum post, and click the (ellipsis) icon. Then, click Create Ticket.
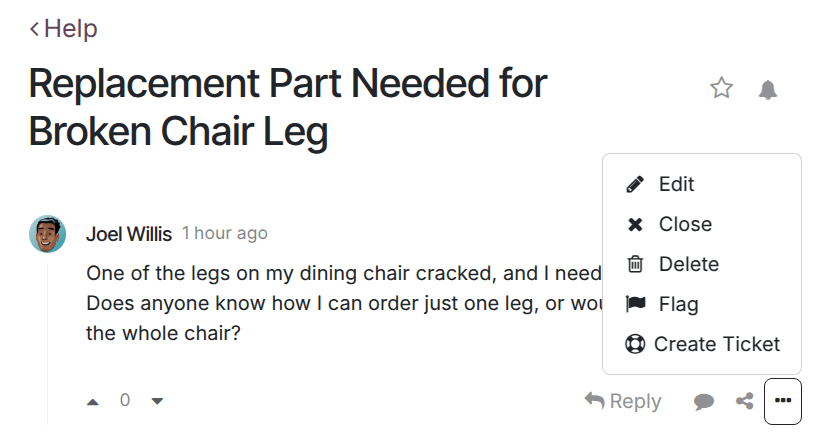
This opens a Create Ticket pop-up. Make any necessary edits to the Create Ticket field. Then, confirm the Helpdesk Team the ticket should be assigned to.
Click Create & View Ticket or Create Ticket.
注解
The original forum post is linked in the chatter on the new ticket.
在线网课
Odoo eLearning courses offer customers additional training and content in the form of videos, presentations, and certifications/quizzes. Providing additional training enables customers to work through issues and find solutions on their own. They can also develop a deeper understanding of the services and products they are using.
在服务台团队中启用线上学习课程
To enable eLearning courses on a Helpdesk team, go to and select a team, or create a new one.
On the team’s settings page, scroll to the Help Center section, and check the box next to eLearning. A new field appears below, labeled Courses.
点击 线上学习 功能下方 课程 旁边的空白区域,显示一个下拉菜单。从下拉菜单中选择可用的课程,或在字段中键入标题,然后单击 创建并编辑 从本页创建新课程。可为一个团队分配多个课程。
创建线上学习课程
A new eLearning course can be created from the Helpdesk team’s settings page, as in the step above, or from the eLearning app.
To create a course directly through the eLearning application, navigate to . This reveals a blank course template that can be customized and modified as needed.
在课程模板页面,添加 课程名称,并在其下方添加 标签。
Click on the Options tab.
Under Access Rights, select which users are able to view and enroll in the course.
The Show Course To field defines who can access the courses. The Enroll Policy field specifies how they can register for the course.
Under Display, choose the preferred course Type.
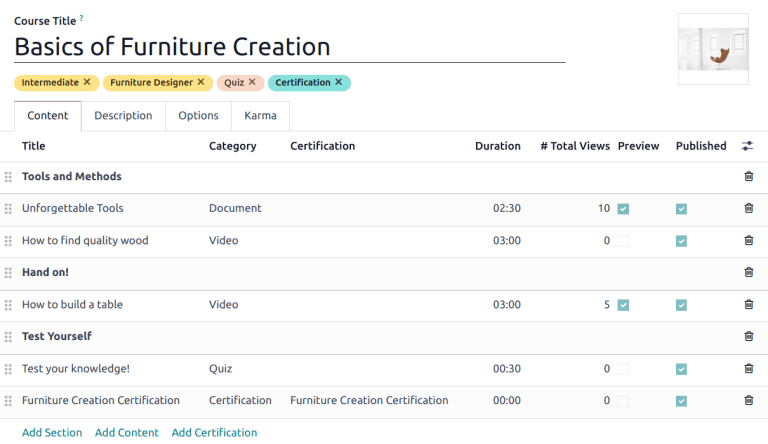
将内容添加到线上学习课程
要为课程添加内容,请单击 内容 选项卡并选择 添加内容。从下拉菜单中选择 内容类型,然后上传文件或粘贴链接。完成后单击 保存。 单击 添加章节 按章节组织课程。
注解
要在课程中添加认证,请访问 ,选中标有 认证 的复选框,然后 :guilabel:`保存`以激活设置。
发布线上学习课程
To allow customers to enroll in a course, both the course and the contents must be published.
小技巧
If the course is published, but the contents of the course are not published, customers can enroll in the course on the website, but they are not able to view any of the course content. Knowing this, it may be beneficial to publish the course first, if the course contents are intended to be released over time, such as classes with a weekly schedule.
要想一次性提供整个课程,必须先发布每个课程内容,然后才能发布课程。
To publish a course, choose a course from the eLearning dashboard. On the course template page, click the Go to Website smart button.
这将显示课程网页的前端。在课程网页的顶部,将 未发布 切换开关移至 已发布。
从后台发布线上学习课程内容
To publish eLearning course content from the back-end, choose a course from the eLearning dashboard. On the course template page, click the Published Contents smart button.
这样就会出现一个单独的页面,显示与该课程相关的所有已发布内容。从右上角的搜索栏中移除默认的 已发布 筛选器,即可显示与课程相关的所有内容,包括未发布的内容。
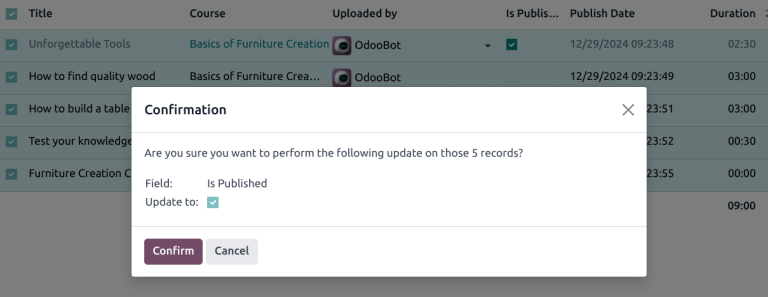
Click the (list) icon to switch to list view.
While in list view, there is a checkbox on the far-left of the screen, above the listed courses, to the left of the Title column title. When that checkbox is clicked, all the course contents are selected at once.
With all the course content selected, click any of the boxes in the Is Published column. This reveals a pop-up window, asking for confirmation that all selected records are intended to be published. Click Confirm to automatically publish all course content.